When deploying a Java application, you should always bundle a JRE. While a JRE with the required version may be available in a controlled environment, it is generally far less error-prone to ship a JRE with each media file. Any JRE bundle that is installed by install4j is private to your application and will not interfere with other applications.
install4j offers two ways to create JRE bundles. You can either let install4j download JDK archives from well-known OpenJDK providers and create JRE bundles from them on the fly, or you can create JRE bundles yourself from installed JREs.
How JRE bundles work at runtime
install4j automatically adjusts the JRE search sequence of all generated launchers and includes the bundled JRE as the first choice. A bundled JRE is used automatically by the installer, the uninstaller, custom installer applications and the generated launchers.
A bundled JRE will always be distributed inside the installation root directory, on Windows and Linux/Unix in the directory
<installation directory>/jre
and on macOS in
<content directory>/.install4j/jre.bundle
The content directory is available from the installer runtime variable sys.contentDir
and resolves to the installation directory for folder media file types and Contents/Resources/app
for archive media file types. The actual location of the JRE installation directory is available from
the installer runtime variable sys.preferredJre after the "Install files" action
has run.
When you update your application and include a new JRE bundle, the old JRE bundle will be deleted prior to the installation, so that any files left over from the old JRE cannot interfere with the new JRE.
Generated JRE bundles
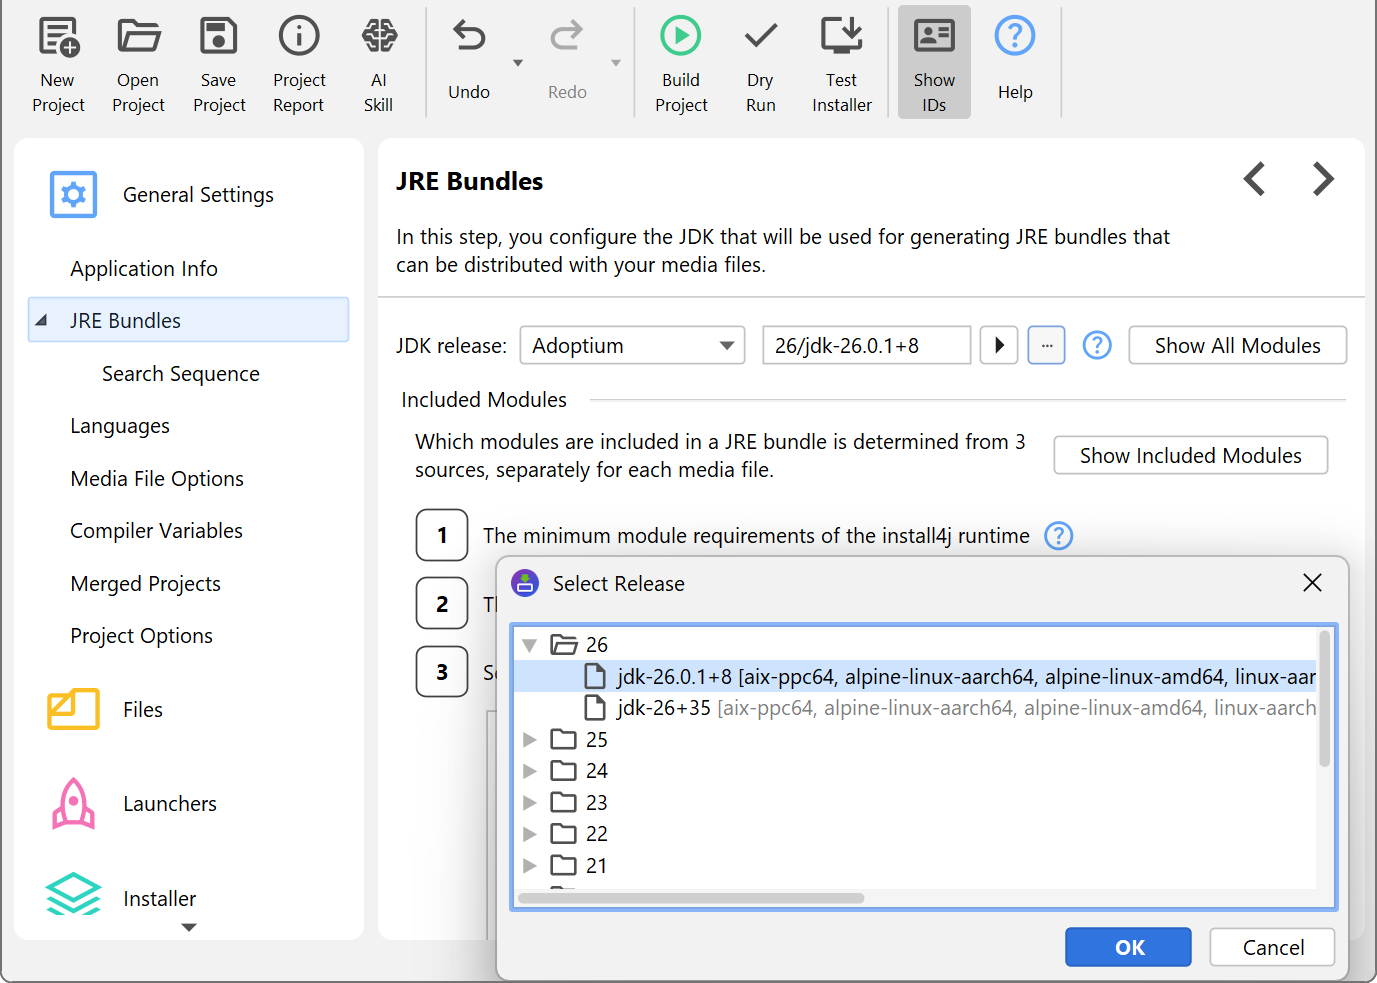
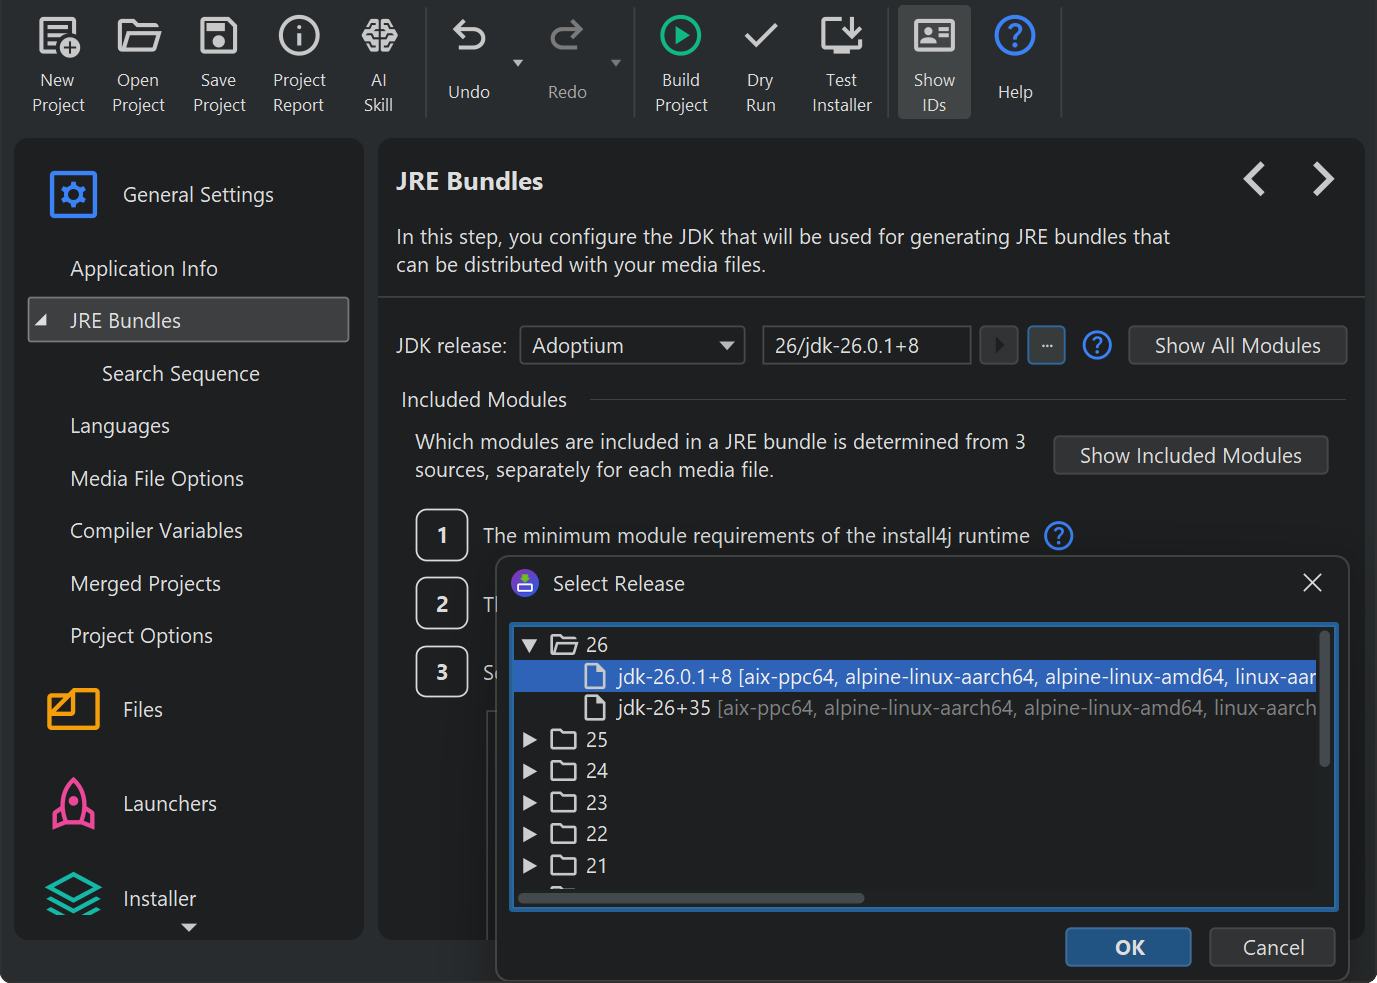
On the "General Settings->JRE Bundles" step, you can use the release chooser dialog to select a release from which you would like to create the JRE bundles. The available platforms are listed next to each release. The standard platform IDs are
windows-amd64for 64-bit Windowswindows-x86for 32-bit Windowswindows-aarch64for 64-bit Windows on ARMmacos-amd64for macOS on x64macos-aarch64for macOS on ARMlinux-amd64for 64-bit Linuxlinux-x86for 32-bit Linuxlinux-aarch64for 64-bit Linux on ARM
Other platforms may be provided by the JDK providers and are usable in the Linux/Unix media files.
By default, Adoptium is set as the JDK provider and is recommended for general purpose usage. For JavaFX applications, the Liberica and the Zulu providers are convenient, because JavaFX is already included, and you don't have to work with separately downloaded JMOD files. Liberica also offers an especially wide range of Linux architectures. For Swing desktop applications, the JetBrains Runtime is the best choice because it contains a lot of fixes that are not included in the upstream OpenJDK. Finally, Amazon Corretto is an OpenJDK distribution that focuses on including additional fixes and patches from the main branch and other sources in older releases.
Selecting a release folder node in the chooser dialog rather than a node for a specific release will insert a
key ending in /latest. At compile time, the latest release that includes the
required platform will be taken.
To add new JDK providers, an SPI is provided in resource/jdk-provider.jar. The associated Javadoc
in the archive resource/jdk-provider-javadoc.jar has more information.
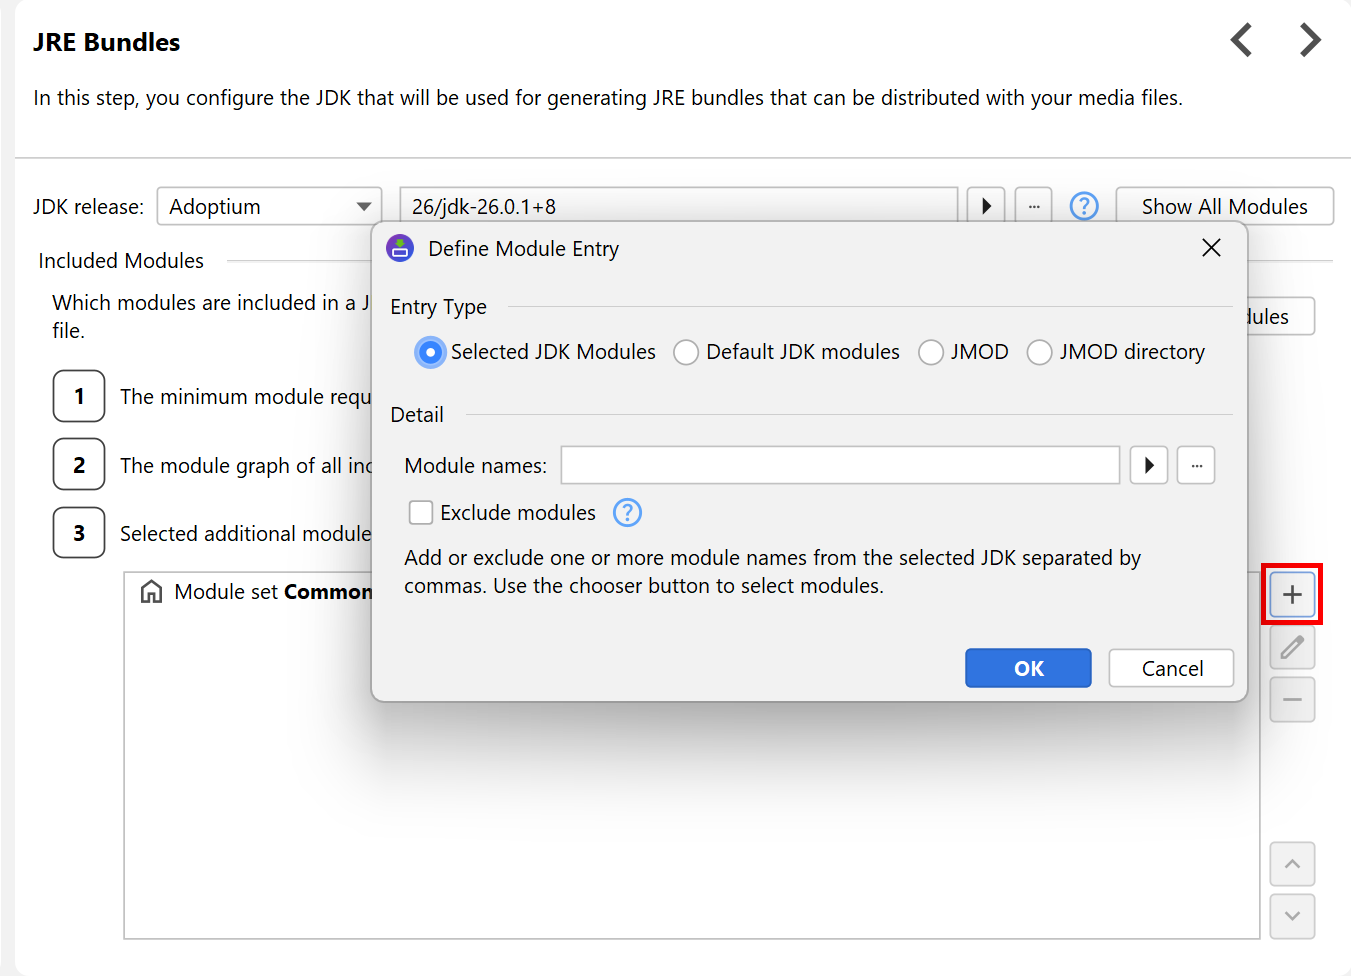
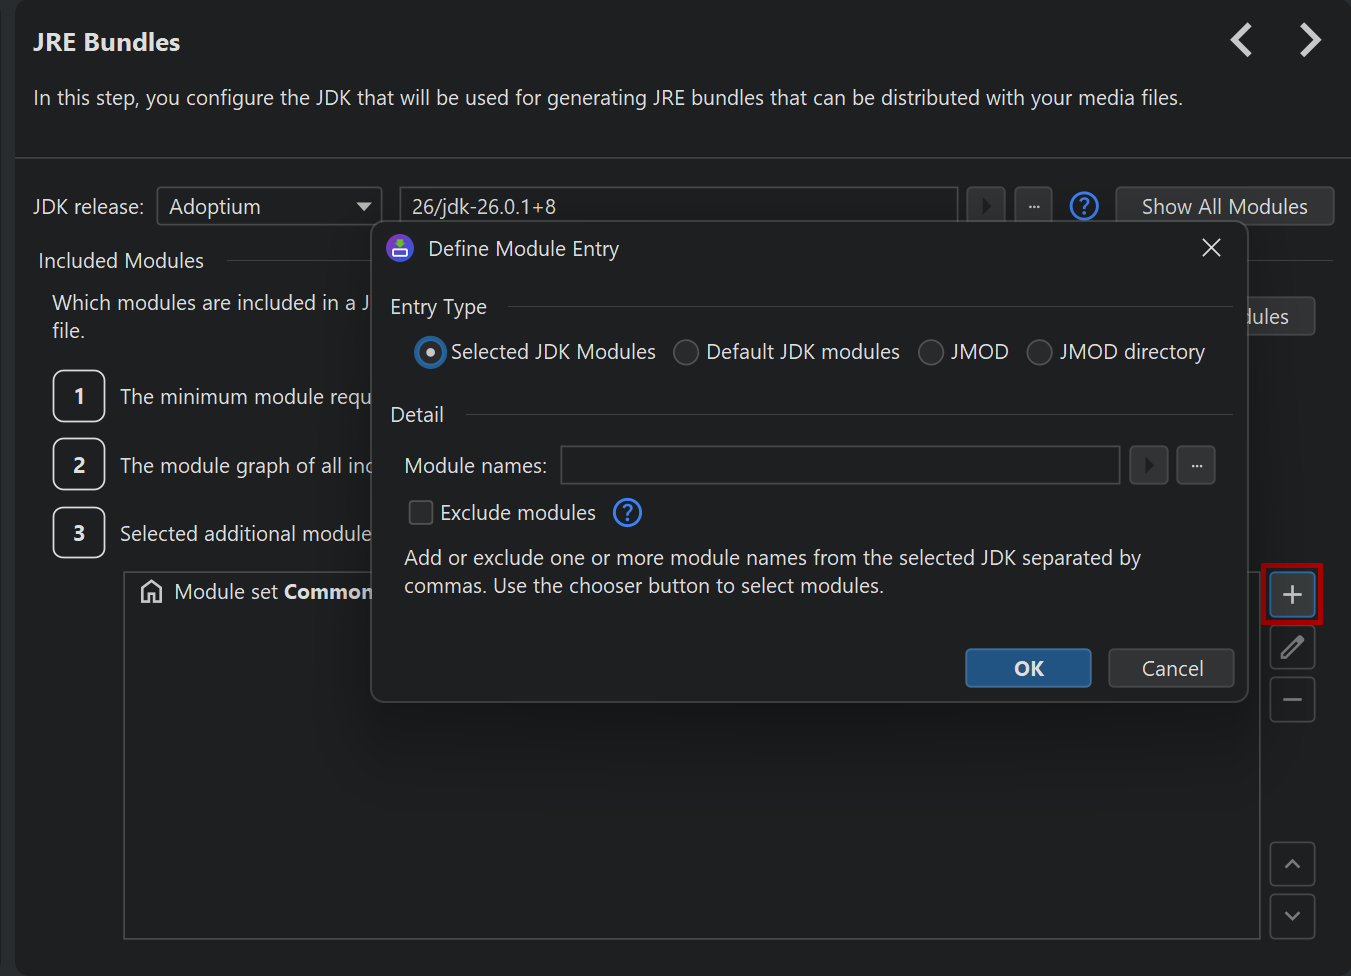
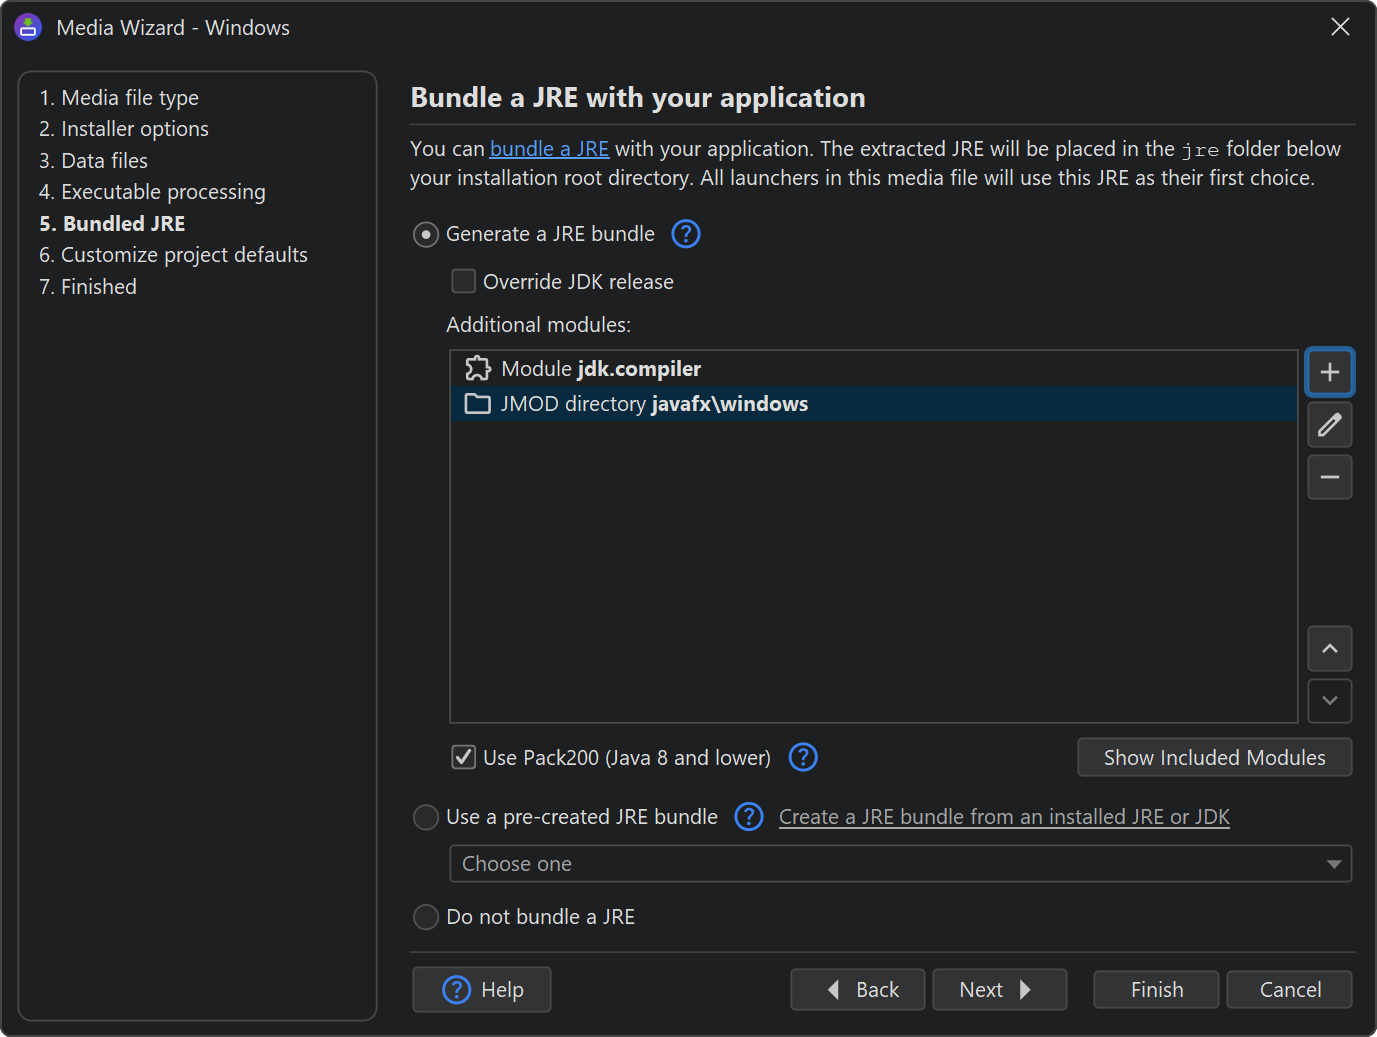
Downloaded JDK bundles contain all kinds of modules that you do not need in your distribution. On the other hand, you may have a set of JMODs that have to be linked into the JRE bundle, such as JavaFX. With your configuration in the module selector, you can include a base set of modules, single named modules and additional JMODs. By default, a "JRE" with commonly used modules is linked, but the module sets "Minimum" and "All" are also available.
install4j always adds modules that are required by the install4j runtime. This includes the
java.desktop module which is required even if you only want to create console installers or
archives. In addition, install4j scans the module requirements of your
generated launchers and adds them automatically. With the
Show included modules button, you can show the actual list of modules that will be added to the JRE bundle.
In Java 8 there is no module system, so the entire JRE is bundled for those versions.
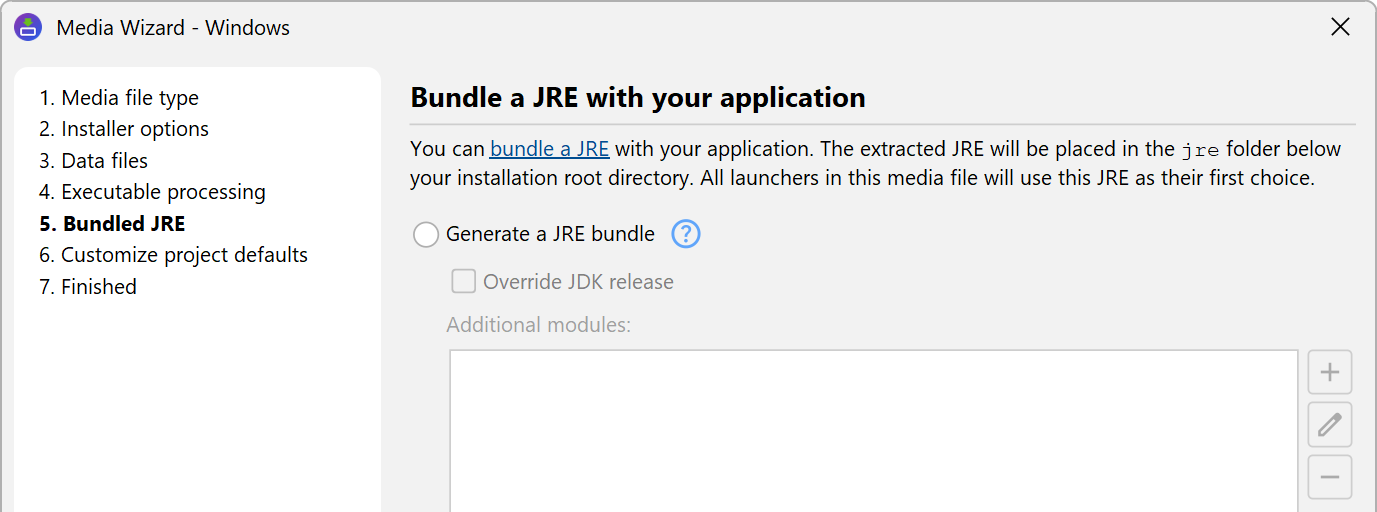
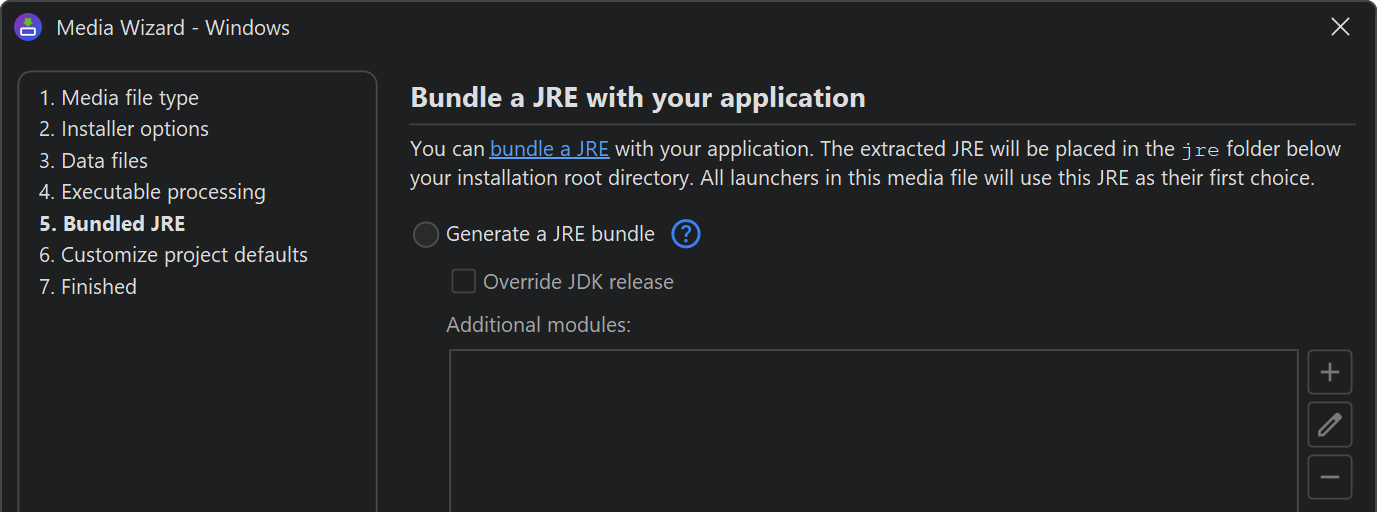
In the "Bundled JRE" step of the media wizard, the "Generate a JRE bundle" option is selected by default. You can set it to "Do not bundle a JRE" in order to create media files without JRE bundles. Furthermore, you can customize the common JRE bundle configuration.
In addition to overriding the JDK provider and the release, you can specify additional modules and JMOD files that should be included for the current media file. The Show included modules button on this step uses the JDK bundle for the target platform unlike the corresponding button on the "General Settings->JRE Bundles" step which uses the JDK bundle for the current platform. This can lead to slight differences because JDKs contain platform-specific modules.
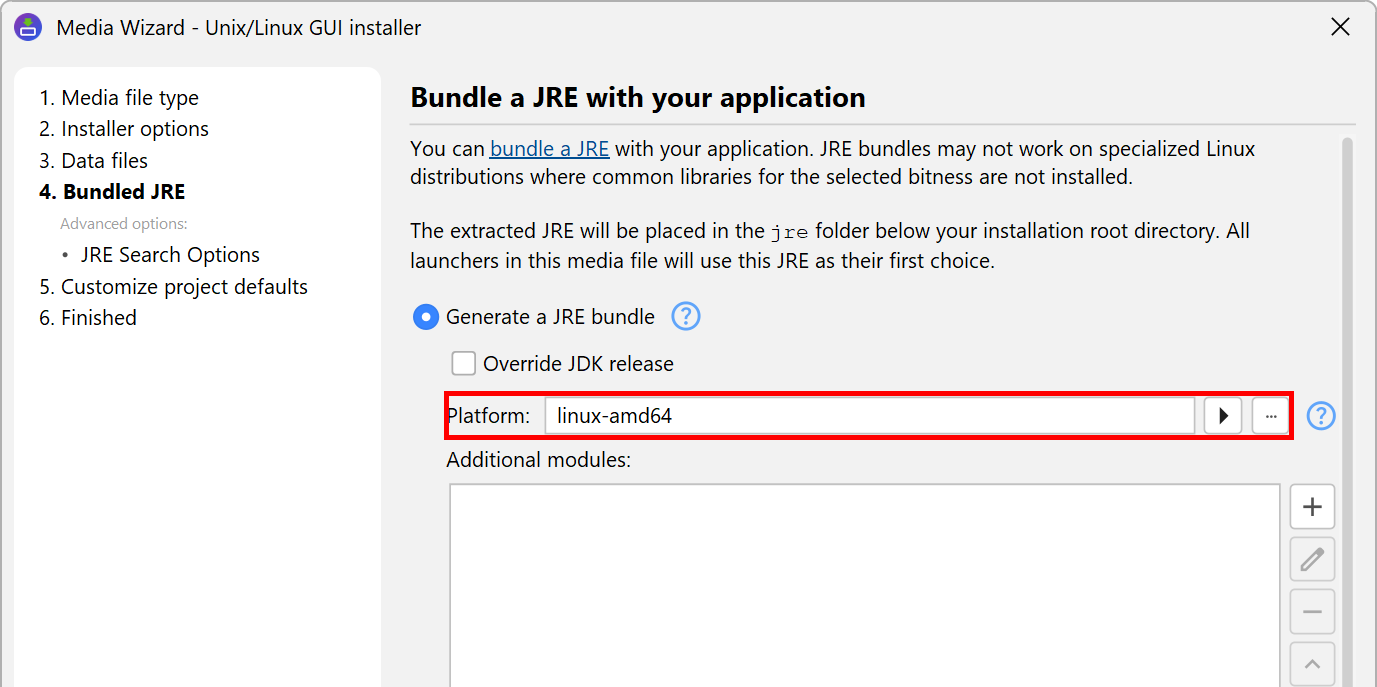
For Unix/Linux media files, the actual platform must be defined on the "Bundled JRE" step of the media wizard.
By default, it is set to linux-amd64 which stands for 64-bit Linux. The chooser button
displays a dialog with all platforms that are available for the selected release.
If Java 8 is bundled, you can optionally deactivate the Pack200 compression for JAR files in the JRE. In archives, for example, these JAR files are decompressed the first time when a generated launcher is executed, adding a possibly undesired lag. That is why Pack200 compression is not selected by default for archive media files. Pack200 compression is unavailable for macOS single bundle archives where the signature requirements forbid the modification of any included files.
install4j will cache both downloaded JDK bundles and generated JRE bundles in the JRE cache directory
%LOCALAPPDATA%\install4j\v<version>\cached_jres
on Windows.
~/Library/Caches/install4j/v<version>/cached_jres
on macOS, and
.cache/install4j/v<version>/cached_jres
on Linux and Unix where the root directory can be modified with the environment variable XDG_CACHE_HOME.
You can move the contents of this directory including the subdirectories "original" and "generated" to another machine to avoid downloads and speed up compilation. You can also delete this directory to force install4j to re-download all JDK bundles and generate new JRE bundles.
Pre-created JRE bundles
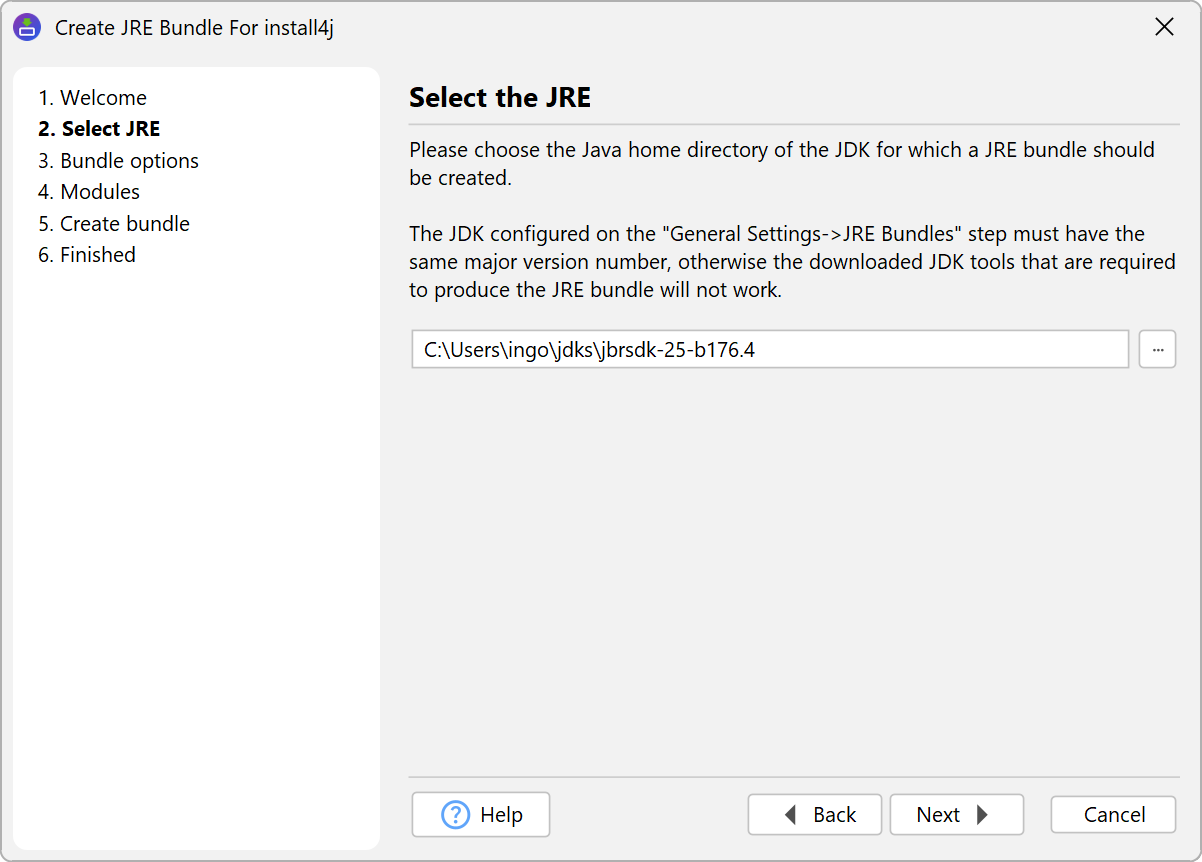
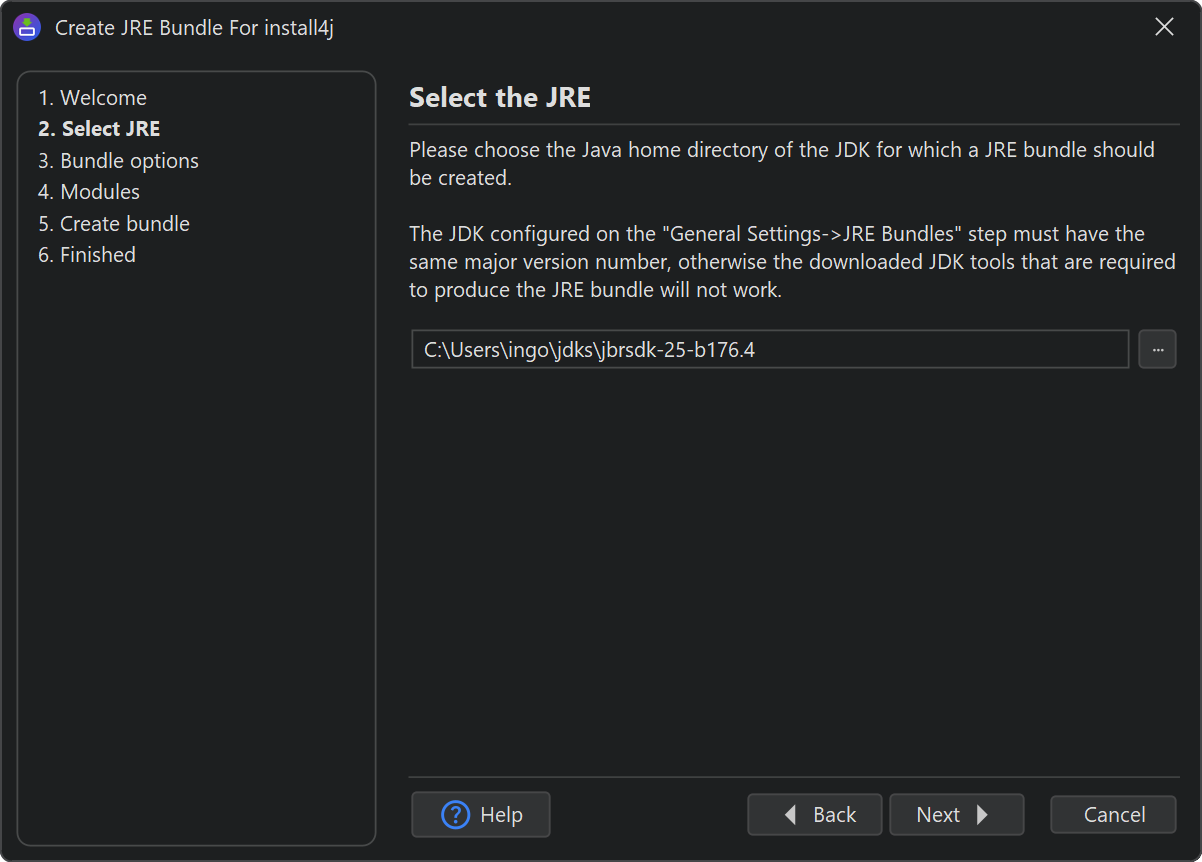
You can create a JRE bundle from any installed JRE on your file system. install4j offers the "Create a JRE bundle" wizard in the "Project" menu to make this task as simple as possible.
If you wish to automate the process, a command line tool for building JRE bundles is available with corresponding tasks in the Gradle, Maven or ant integrations.
Packaging your own JRE can be useful if you want to use JDK providers not supported by install4j (such as the official Oracle JDKs), or if you want to use runtime images that were created by jlink. The JRE bundle wizard only works for the platform you are running on. That means, to create a JRE bundle for Windows, you have to run install4j on Windows, to create a bundle for Linux, you have to run install4j on Linux.
All JREs are saved with a tar.gz extension to the root of the pre-created JRE directory which is
%LOCALAPPDATA%\install4j\v<version>\jres
on Windows.
~/Library/Application Support/install4j/v<version>/jres
on macOS, and
.local/share/install4j/v<version>/jres
on Linux and Unix where the root directory can be modified with the environment variable XDG_DATA_HOME.
Pre-created JRE bundles can be selected in the "Bundled JRE" step of the media wizards
If you would like to put your JRE bundles into a different directory, such as a directory
in a version-controlled location, you can copy the .tar.gz file to that directory with the
Copy Bundle File button and choose "Manual entry" in the JRE bundle drop-down to enter the path to
the bundle file.
JRE bundle format
In special cases you might want to create or modify a JRE bundle programmatically,
without using the install4j IDE or the command line tools. This can be done with the standard
GNU tools tar and gzip.
A JRE bundle for install4j is simply a file with the naming scheme:
[operating system]-[architecture]-[JRE version].tar.gz
For windows bundles, the operating system name must be "windows", for macOS "macos" and for Linux and Unix
any name can be used. The .tar.gz file contains the JRE bin
and lib folders as top-level entries. The steps to create a bundle are outlined below:
cd jre
tar cvf minix-x86-11.tar *
gzip minix-x86-11.tar
cp minix-x86-11.tar.gz $HOME/.local/share/.install4j/v<version>/jres
First you change into the top-level directory of the JRE, then you tar all files and directories and gzip the tar archive.