Applications are configured on the Screens & and actions step.
The top-level nodes represent the different applications that can be configured for the project. There are three types of applications:
-
Installer
The installer is the application that is executed when the media file is invoked by the user, for example, when the user double-clicks on the installer executable in the Windows explorer. The installer cannot be deleted from the tree of installer elements. -
Uninstaller
The uninstaller is a special application for uninstalling an installation. It is used in various contexts and can be
- directly invoked by the user
- invoked from the Windows software registry
- invoked by the "Uninstall previous installation" action
The uninstaller cannot be deleted from the tree of installer elements. If you do not wish to generate an uninstaller, you can disable it.
-
Custom installer application
You can add any number of custom installer applications that can be invoked after the installation. install4j comes with several templates for auto-updater downloaders. Custom applications can also be used for writing maintenance applications for your installation.You can add a new custom installer application by clicking on the Add button on the right side of the list and choosing
Add Applicationfrom the popup. The application templates dialog will be displayed and lets you choose a starting point for your custom installer application. Application templates are entirely made up of existing screens, actions and form components. You can modify the selected application template after adding it.Unlike the installer and uninstaller above, custom applications are also created for archive media files. See the help topic on media files for more information on how to create first-run installers for archives.
Custom installer applications with a non-empty "Executable directory" property are automatically added to the "Default file set". If you leave the executable directory empty, the custom installer application is added to the
.install4jdirectory and will always be included, regardless of the installation component configuration.
Each installer application has a startup sequence of actions. Those actions are executed before the installer application presents a user interface. If any of these actions fails and has a "Quit on failure" failure strategy, the installer application will not be shown.
Properties of installer applications
Common properties of installer applications are:
-
allowConsole [Configuration]
allowConsole -
allowUnattended [Configuration]
allowUnattended -
arguments [Configuration]
arguments -
consoleScreenChangeHandler [Configuration]
consoleScreenChangeHandler -
customIconImageFiles [Configuration]
customIconImageFiles -
customizeVersionInfo [Configuration]
customizeVersionInfo -
disableConsoleOnWindows [Configuration]
disableConsoleOnWindows -
executionMode [Configuration]
executionMode -
frameHeight [Configuration]
frameHeight -
frameSizeClientArea [Configuration]
frameSizeClientArea -
frameWidth [Configuration]
frameWidth -
helpCustomizer [Configuration]
helpCustomizer -
resizable [Configuration]
resizable -
rollback [Configuration]
rollback -
splashMessage [Configuration]
splashMessage -
unattendedAlerts [Configuration]
unattendedAlerts -
unattendedProgressInterfaceProvider [Configuration]
unattendedProgressInterfaceProvider -
unixFallbackToConsole [Configuration]
unixFallbackToConsole -
useCustomIcon [Configuration]
useCustomIcon -
versionInfoCopyright [Configuration]
versionInfoCopyright -
versionInfoFileDescription [Configuration]
versionInfoFileDescription -
versionInfoFileVersion [Configuration]
versionInfoFileVersion -
versionInfoInternalName [Configuration]
versionInfoInternalName -
versionInfoProductName [Configuration]
versionInfoProductName -
vmParameters [Configuration]
vmParameters -
windowsConsoleExecutable [Configuration]
windowsConsoleExecutable -
Executable icon [Executable]
By default, a standard installer icon is used for the executable. To customize the icon, press the customizer button in the configuration pane. -
macOS entitlements file [macOS]
If you have configured code signing for macOS, an entitlements file can unlock certain features on macOS, such as iCloud storage or push notifications. -
Custom fragment for Info.plist [macOS]
On macOS, you may want to add additional elements to the Info.plist file of the application bundle in order to customize its behavior in ways that are not directly supported by install4j. -
Custom script fragment [Unix]
On Unix and Linux, the JVM for an installer application is launched by a shell script. To add your own code to the shell script, you can specify a script fragment that is added immediately before the java invocation takes place. -
Screen Style [GUI Options]
The default screen style for this installer application. Screens and screen groups can override this style. -
Action elevation type [Privileges]
If any contained actions should run in the elevated helper process, if their "Action elevation type" property is set to "Inherit from parent".An elevated helper process is available on Windows and macOS if the process has been started without admin privileges and the "Request privileges" action has been configured to require full privileges.
Custom applications as well as the uninstaller are added to the distribution tree and have additional related properties:
-
customMacosExecutableName [Configuration]
customMacosExecutableName -
executableDirectory [Configuration]
executableDirectory -
executableName [Configuration]
executableName -
unixMode [Configuration]
unixMode -
useCustomMacosExecutableName [Configuration]
useCustomMacosExecutableName
The remaining properties that are specific to the installer are:
-
Suppress initial progress dialog [Execution Options]
If selected, the initial native progress dialog of the installer is not displayed. -
Replacement script for language code [General Customization Options]
With this script you can replace the language that the installer will run with.Parameters: The parameter languageCode contains the 2-letter ISO 639 code of the auto-detected language. If auto-detection has not been enabled on the language step of the general settings, the parameter will be null.
Return value: If you return null, the language selection dialog will be shown, if you return a language code, the language selection dialog will not be shown, and the returned language will be used. If the returned language code is a language that is not configured for this installer, the language selection dialog will be shown.
-
Create log file for stderr output [Windows]
If selected, and output on stderr is detected, a log file will be created and all output to stderr will be redirected to that file. -
Log file for stderr [Configuration]
The log file for the stderr output relative to the installer media file.This property is only visible if "Create log file for stderr output" is selected.
Finally, custom installer applications have the following additional properties:
-
Create executable [Executable]
If selected, an executable for this installer application will be created. If not selected, this application launcher can only be invoked with the com.install4j.api.launcher.ApplicationLauncher API or an automatic launcher integration.For macOS single bundles, executables for installer applications are never created.
-
Single instance [Configuration]
If checked the application will ensure at startup that there is only one instance running per user account.This property is only visible if "Create executable" is selected.
-
File set [Executable]
Choose the file set to which the installer application is added. File sets can be defined on the Files->Define Distribution Tree step.This property is only visible if "Create executable" is selected.
-
Change working directory [Execution Options]
If selected the working directory will be changed to the value in 'Working directory' at startup. -
Working directory [Configuration]
The working directory to be used when 'Change working directory' is selected.This property is only visible if "Change working directory" is selected.
-
Execution level [Windows]
The execution level for this application. If you want to modify files in the installation direction, you most likely need administrator rights. This is only relevant for Windows Vista and higher. -
Window title [GUI Options]
The title of the application window. -
Show message when user cancels [GUI Options]
If selected, a message will be shown when the user cancels the installer application by clicking on the "Cancel" button or closing the application frame. -
Cancel message [Configuration]
The message that is shown if the user cancels the installer application by clicking on the "Cancel" button or closing the application frame. The options that are presented to the user are "Cancel" or "Continue".This property is only visible if "Show message when user cancels" is selected.
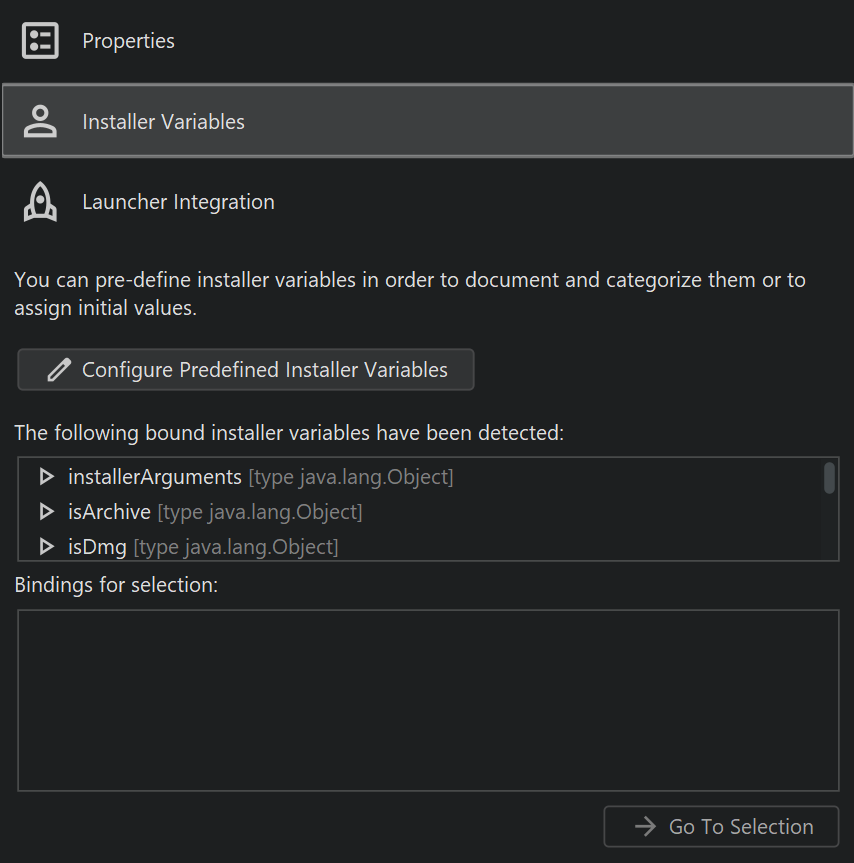
Configuring installer variables
The second tab in the configuration area for installer applications is the Installer variables tab. Here, you can check the bindings for all detected installer variables and pre-define installer variables. For more information, see the help topic on variables.
An additional feature with respect to the variable selection dialog is that you can navigate to a binding by selecting an element in the binding tree at the bottom and click on the Go To Selection button.
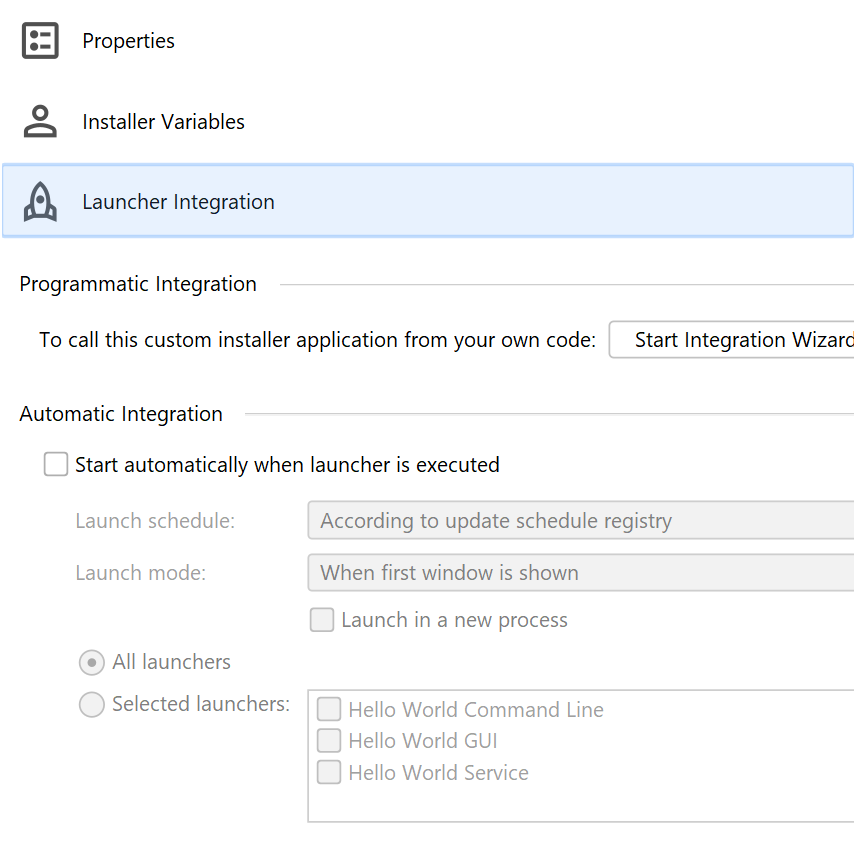
Launcher integrations
Custom installer applications have a Launcher integrations tab in the configuration area that helps you to start them when launchers are executed.
One way to start an installer application is programmatically, by using the install4j API. To get the code snippet for starting the selected installer application, click on the Start integration wizard button. The integration wizard will present a number of options that control the condition and possible callbacks from the installer application.
Another way to start an installer application is automatically, by defining a launch schedule and a launch mode. The launch schedule is one of
-
Always
Every time you start the launcher, the installer application will be started as well. -
According to update schedule
install4j provides a built-in update schedule registry that can be configured by the user on a form screen with an "Update schedule selector" form component. Also, you can programatically modify the update schedule through the classcom.install4j.api.update.UpdateScheduleRegistryin the API. The selected installer application will be started only if the update schedule requires an update check. -
First run of any launcher in archive media file by the current user
For archive media files (such as a Windows ZIP file), no installer is available. To execute a sequence of screens and actions when a launcher is started for the first time after the archive has been extracted, use this launch schedule. It may be convenient to link to screen groups in the installer to avoid duplicating configuration in your custom installer application.
In your launcher, you can check for this condition with
com.install4j.api.launcher.ApplicationLauncher.isNewArchiveInstallation()
in case you want to perform some actions outside a custom installer application.
The launch mode is one of
-
Blocking at start up
When the launcher is started, the selected installer application will be started first. When the installer application terminates, the launcher will then start up, unless a "Shut down calling launcher" action has been executed. -
Non-blocking at start up
When the launcher is started, the selected installer application will be started immediately. The launcher continues to start up in parallel. -
When first window is shown
The selected installer application will be started when the first window is shown. This works for AWT, Swing and SWT applications. If you have an SWT application, the "Uses SWT" check box in the "Executable info" step of the launcher wizard must be selected.
Just like with the API, the installer application can be started in the launcher process itself or in a new process. By default, the installer application is started in the same process. If the "Blocking at start up" or "Non-blocking at start up" launch modes are selected, the look and feel is set to the system look and feel. For the "When first window is shown" launch mode, the look and feel is not changed, so your own look and feel will be used. When the installer application is executed in the same process, the "Shutdown calling launcher" action has a different effect: The whole process will be terminated when the installer application exits.
By default, the selected installer application is started for all launchers in your project. If this is not desired, you can restrict the integration to selected launchers. Note that if "All launchers" is selected and the project is merged into another project, the integration will be performed for all launchers in the main project as well.