Introduction
On macOS, software is usually delivered as a DMG. DMG stands for "Disk image" and contains a file system
that can be mounted, rather than an archive that can be extracted. When the user double-clicks on a DMG file
in the Finder, it is mounted to /Volumes/[volume name] and a new Finder window is opened
for the mount point.
The Finder can by styled on a per-directory basis and the information about that styling is saved to a file named
.DS_Store in every directory. This means that you can ship styling information with a DMG file.
Styling includes setting a background image for the Finder window and that image file can be added to the DMG as well.
For single bundle GUI applications, a styled DMG generally includes a symbolic link to
/Applications in the top-level folder of the DMG, so that user can drag the application bundle into
the default installation directory with minimum effort.
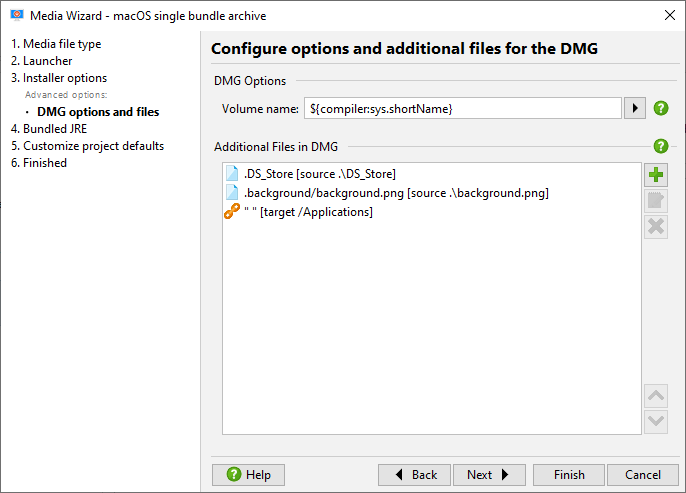
install4j allows you to add any number of files and symbolic links to the DMG. All macOS media file types
have a step named "Additional files in DMG" as a sub-step of the "Installer options" step. Here, you can
add the top-level .DS_Store files, a background image and the symlink to /Applications.
Step-By-Step Instructions
To create your .DS_Store file, please follow the steps below. You will need a Mac with macOS 10.7+
and an installation of install4j on that machine.
- Compile DMG
The first step is to compile your macOS media file from install4j - without any custom styling. This DMG will be the template for which we will define the style. You cannot use just any other DMG, because each media file has a unique ID. When using background images, the
.DS_Storefile must have been created for a DMG with the same ID, otherwise the image will not be found reliably.When you recompile the media file in install4j, this ID remains the same, so you can add the
.DS_Storefile from a previously compiled DMG to the additional DMG files in the media wizard. - Convert the read-only DMG to a writable DMG
The generated DMG is a read-only image. In order to make any modifications at all, we have to convert the DMG to a writable format.
First, make sure that the DMG is not mounted. In a terminal, cd to the directory where the DMG was created and execute
hdiutil convert hello.dmg -format UDRW -o hello_rw.dmg
where "hello" has to be replaced by the actual name af your media file. Note that the last argument has "_rw" appended at the end, because the output DMG must be different from the input DMG.
- Enlarge the writable DMG
By default, a DMG generated by install4j is full. It is not possible to add any more files simply because the file system in it has no more available space. To enlarge the DMG, we first determine its current size by executing
hdiutil resize hello_4_0_rw.dmg
The "cur" column of the output shows the number 512-byte sectors. To add about 10 MB, we add 20000 to that number and execute
hdiutil resize -sectors [new number of sectors] hello_4_0_rw.dmg
To check the new size, run
hdiutil resize hello_4_0_rw.dmg
again.
- Mount DMG
We now mount the read/write DMG by executing
hdiutil attach hello_4_0_rw.dmg
and note the mount point /Volumes/[volume name] that is given by the output of the above command.
- Copy background image to DMG
To add a background image, we first have to copy the image to the DMG. We do not want the image file to show up in the finder, so we create a hidden directory in the DMG. To do that, we execute
cd /Volumes/[volume name]
mkdir .background
To open this hidden directory in the Finder, we execute
cd .background
open .
Now, we open another Finder window, locate our background image and copy it to the hidden directory that is visible in the original Finder window.
- Select background image for DMG top-level folder
Since we need the Finder with the hidden directory in a minute, we leave it as it is, and double-click on the mounted volume on the desktop to open the default Finder window for the DMG. We position the new Finder window side-by side with the Finder window that shows the hidden directory.
To start changing styles, we invoke View->Show View Options. This will show a tool window with styling controls. In the "Background" section, we choose "Picture" and notice the drop target for a picture file.
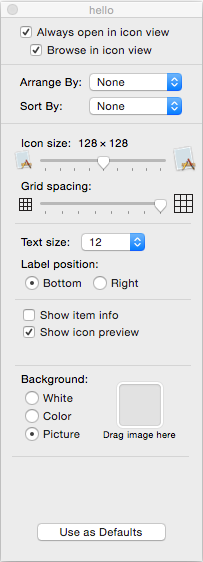
Now we have to perform a somewhat tricky operation. From the Finder window that shows the hidden directory, we drag the image to the mentioned drop target in the view options dialog without activating that Finder window (otherwise the view options dialog would change its target folder).
Finally, we see can see the background image applied to our read/write DMG.
- Adjust DMG finder window
Two properties of the Finder window should be adjusted: Invoke View->Hide Toolbar and resize the window so that it fits the size of the background image.
- Add link to /Applications for single-bundle archives
If you have a single-bundle archive media file type, you probably want to add a drop-target for the installation. In the terminal, we execute
cd /Volumes/[volume name]
ln -s /Applications " "
This creates a link with an empty name that immediately shows up in the Finder window. The empty name is a good strategy to get around localization issues. The Applications folder has a special icon and is easily recognizable, so a name is not necessary.
- Adjust icons
Now you can position the icons as needed and adjust the "Icon size" property in the view options dialog until they fit with your background image.
- Extract .DS_Store file
The result of your work above is the
.DS_Storefile in the top-level folder of the DMG. Go to the terminal and copy it to your project folder so that you can reference it in the install4j IDE:cp .DS_Store [project folder]/DS_Store
Note that we have omitted the leading dot before DS_Store in the target path. This makes it easier to work with the file and prevents confusion with the Finder.
At this point, our work with the read/write DMG is finished. We should now delete it and also remove it from the Trash. If we don't do this, subsequent tests will automatically mount this DMG again. This is due to the "alias" feature in macOS. The .DS_Store contains an alias to the configured background image and as long as the original DMG still exists somewhere, it will open it from the template DMG instead of from the newly generated DMG.
Configuring The Media File
In the media file wizard of the install4j project, we can now use the generated .DS_Store file.
On the "Installer Options->Additional files in DMG" step we enter the [project folder]/DS_Store
and give it the name .DS_Store in the DMG.
The background image is added with the name .background/[image name with extension] where the image
name must be the same as on the read/write DMG. The .background folder will be created automatically.
If you have added a symbolic link to /Applications, you can add a corresponding symbolic link entry
here, the name should also be set to the same name as in the read/write DMG. An empty name is entered as " "
(with the quotes).
With the above files and symbolic links the DMG, a newly generated DMG will look the same as the read/write DMG where the styling was added. When you tweak your styling in the future, you don't start from zero but with the styles that are already present in the generated DMG.