The look & feel of installers is now customizable. By default, the look and feel is set to FlatLaf, a cross-platform look & feel with automatic detection of dark or light mode.
What's new in install4j 9.0
Change release:
Please see the change log for a detailed list of changes.
For a discussion of breaking changes when migrating from install4j 8, please see this blog post.
install4j 9.0 introduces the following notable new features:
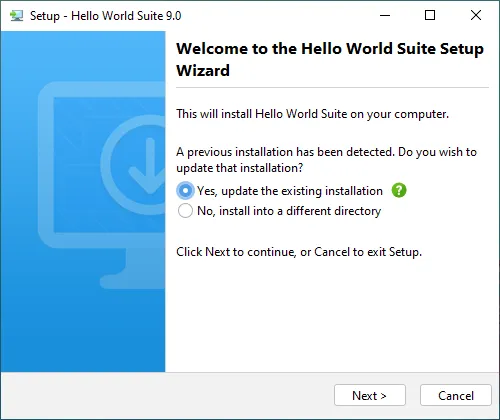
You can adjust the look and feel on the new "Look & Feel" step. You can choose between two built-in themes for the light mode and two built-in themes for the dark mode. The auto-detection of light and dark mode is implemented on macOS, Windows and Linux. On macOS, switching between dark mode and light mode is also detected while the installer is running, on Windows this is only supported with the JetBrains Runtime. You can choose to disable auto-detection and only use either light or dark mode.
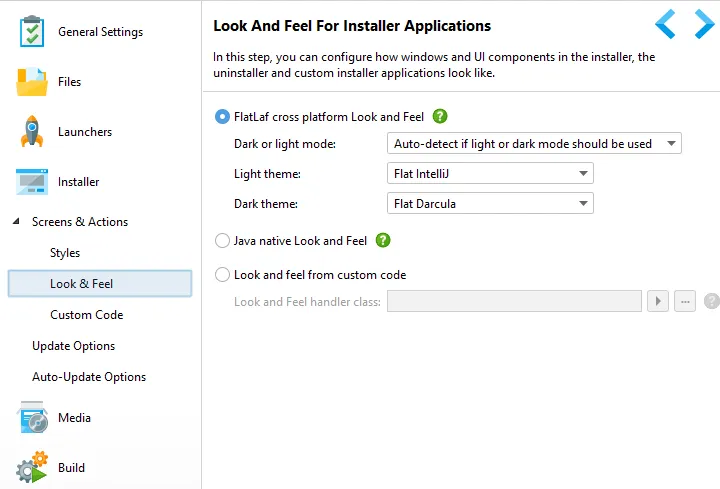
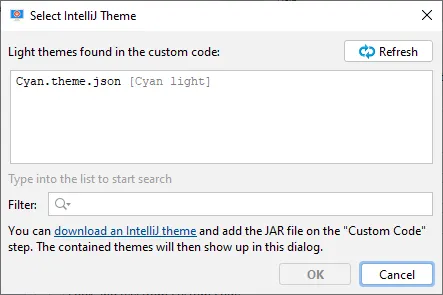
In addition to the built-in themes, you can select themes for IntelliJ IDEA. These themes are based on JSON files that define the colors and other properties of UI elements. Using this mechanism, you can develop your own custom theme for the installer UI.
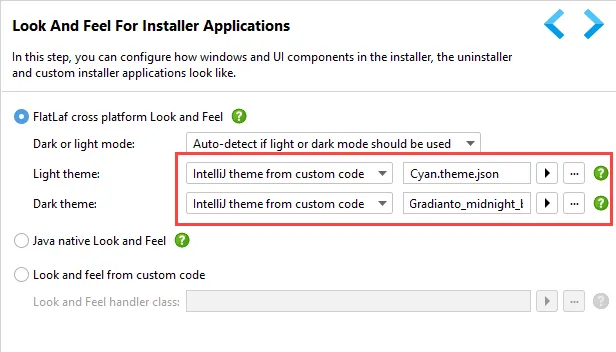
JAR files containing themes have to be added on the "Custom Code" step. After that, you can select the resource path to the JSON file of an IntelliJ theme with the theme chooser.
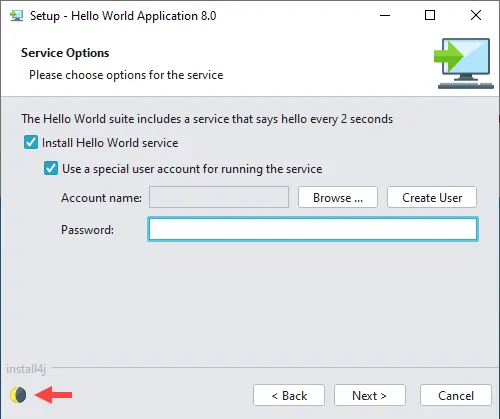
To allow the user to manually switch between dark and light mode, a "Dark mode switcher" form component has been added that can also be used in styles.

If only the icon is shown, the dark mode switcher button has a flat appearance. This makes it a good addition to the footer area, here shown with the "Cyan" light theme.
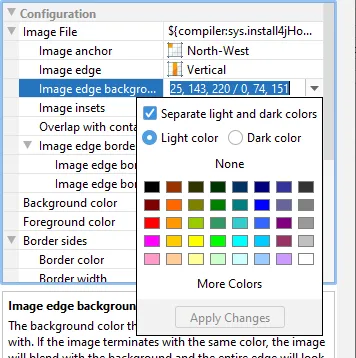
To support light and dark mode with the same screens, all color properties now support light and dark
variants. If you develop custom code, this will automatically be available for all properties
of type java.util.Color.
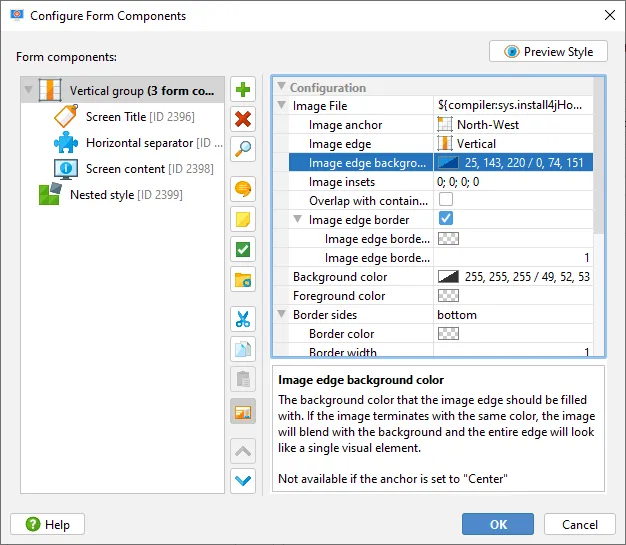
In the color editor, you can choose whether to provide separate colors for light and dark mode or not. For custom code, if different variants are configured, the color instance will be a derived class that seamlessly switches its color component values during a theme change.
The Java native look & feel that is built into the JRE is still supported, although not recommended, because it does not work well with recent releases of macOS and fractional HiDPI resolutions on Windows.
Finally, you can now integrate your own look and feel by implementing com.install4j.api.laf.LookAndFeelHandler
and adding your class on the "Custom Code" step together with the dependencies of the look & feel.
LookAndFeelHandler extends com.install4j.api.laf.LookAndFeelEnhancer that
contains methods for UI elements where the runtime needs special collaboration from the look & feel,
such as the creation of a tri-state check box. You can override the default implementation of these methods
to improve the fidelity of your look and feel in the context of install4j.
The "customCode" sample project contains an example of a custom look and feel.

Finally, you may have noticed from the above screenshots that the install4j IDE is now using FlatLaf as well. Please consider starring FlatLaf on GitHub.
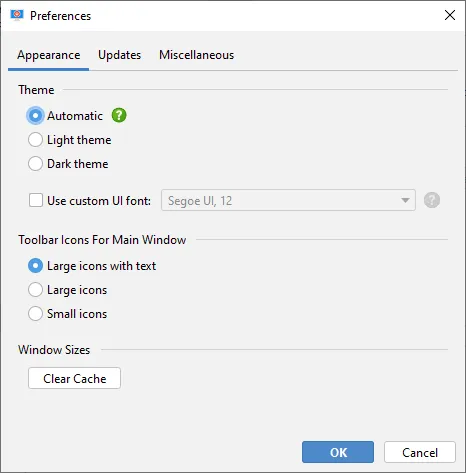
Dark mode and light mode settings for the install4j IDE continue to be available in the preferences dialog.
JDK providers for Amazon Corretto and Azul Zulu have been added to install4j. To use these JDKs, you no longer have to pre-create bundles yourself on all required platforms, but can let install4j do this as part of the build.
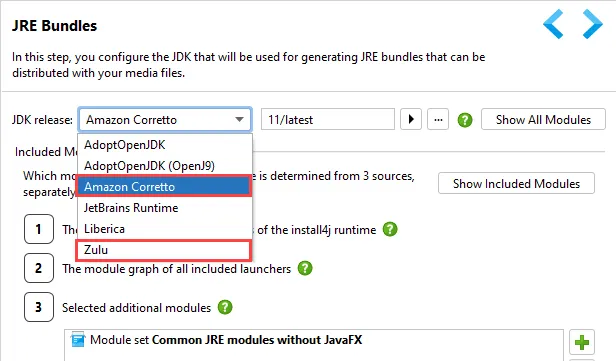
Besides Liberica, Azul Zulu is another option with JavaFX included for recent Java versions. It also offers Java 8 without JavaFX, making the JRE bundles much smaller. In addition, recent releases already include the macos-aarch64 target for machines with Apple Silicon.
Amazon Corretto is an OpenJDK distribution that focuses on including additional fixes and patches from the main branch and other sources into LTS releases. Recently, they have started to add support for the latest feature release as well.
install4j can now produce universal binaries for macOS to support Intel and Apple Silicon at the same time. In the media wizard, you can select the "Universal binaries" architecture on the "Installation options" step.
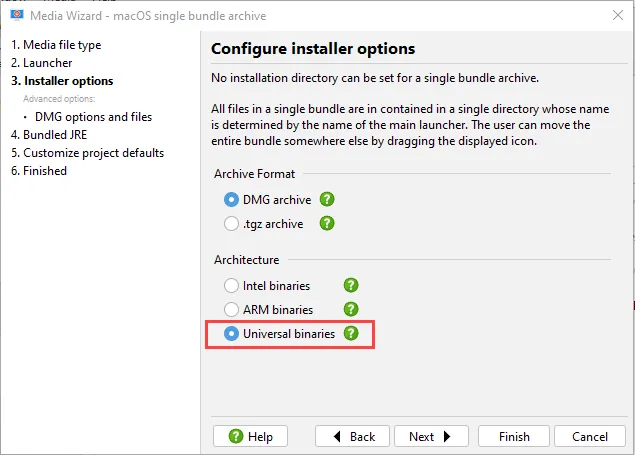
Universal binaries will not only be generated for the launchers and the installer, but also for the JRE bundle. This only works if the selected JDK provider has published both the macos-amd64 and the macos-aarch64 architectures for the selected release. install4j will then download both archives and merge them into a universal JRE bundle.
JRE bundling is now the default. Since Java 9 and the shift from the Oracle JRE to OpenJDK distributions, the concept of public JRE installations has become less and less important. This is why new projects are now configured with an AdoptOpenJDK of the current LTS version and new media files are configured to bundle a JRE by default.

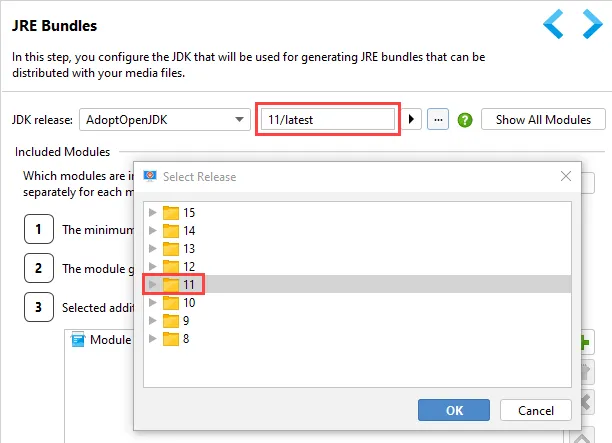
The old "Java version" step is now ordered below the "General Settings → JRE bundles" step, and its minimum Java version setting has become optional. If empty, the required Java version is the major version of the selected JDK. JDK versions now have the syntax <major version>/<provider-specific version> across JDK providers.
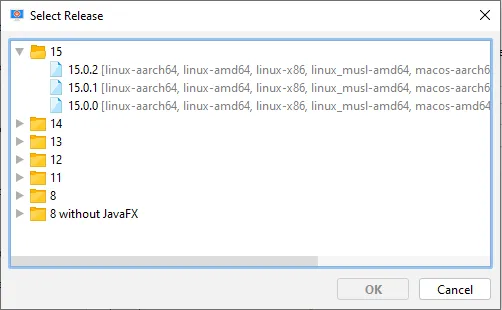
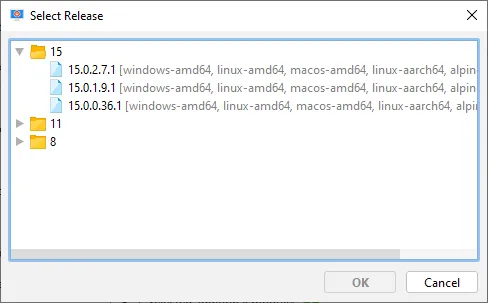
Since install4j 9, you can specify a provider-specific version "latest" to use the latest release of the selected major version. Because media files require a particular platform, this mechanism searches for the latest release in which that platform is available, separately for each media file. You can also insert this version string in the release selection dialog by selecting the folder node of the major version.
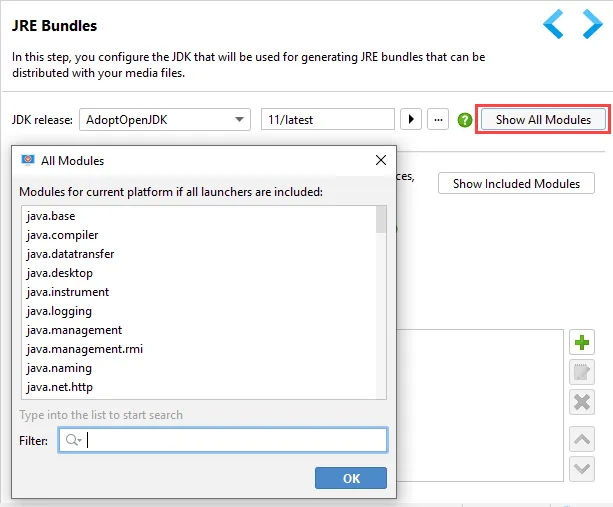
For the configured JDK, it is now possible to inspect all available modules with the "Show All Modules" button. Previously, you could only see which modules would be included in the JRE bundle. That functionality continues to be available with the "Show Included Modules" button.
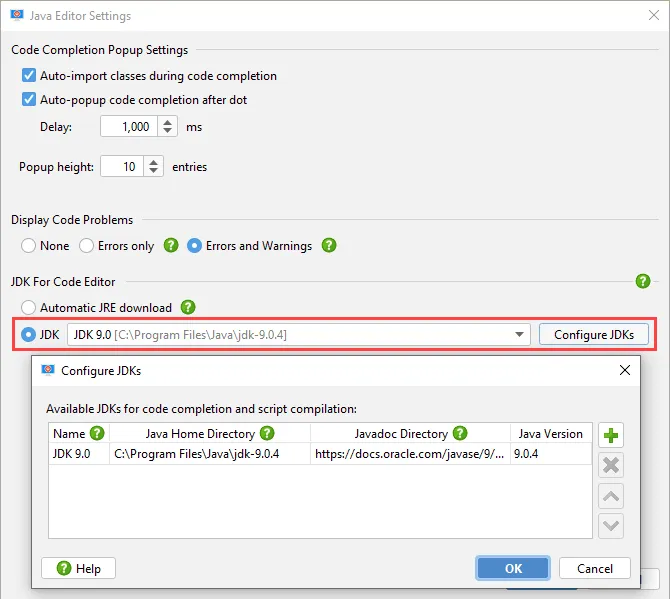
In install4j 9, there is no need to configure the JDK for script compilation and for the script editor, because the configured JDK for the JRE bundle will be used for that purpose automatically. If you do not bundle a JDK, the JRE that install4j is running with will be used as a fallback and you can still manually configure a JDK in the Java editor settings dialog.
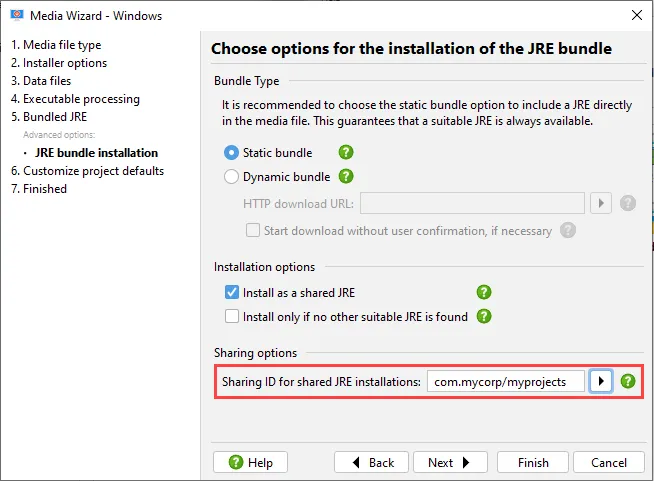
For shared JRE bundles, a sharing ID has been introduced. This limits the sharing to a scope of projects that is defined and controlled by yourself. This also deals with the variable module contents of JREs in the post-Java 9 world. The sharing ID should start with a domain name that is controlled by you and must be configured both by media files that publish a shared JRE as well as by media files whose Java search sequence wants to find a shared JRE.
Warnings have been improved. The warning count is now printed in the build summary, and the text color is orange if there was a warning. For command line builds, you can force the build to fail in that case if you pass the --fail-on-warning command line argument or set the corresponding attributes in the Gradle, Ant and Maven plugins.
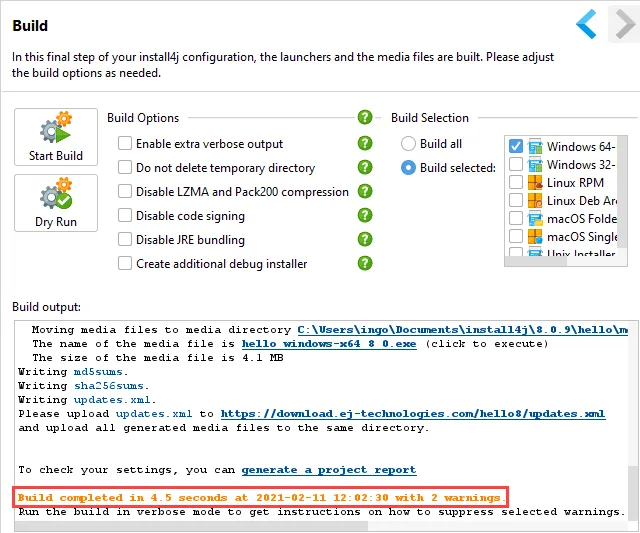
Warnings can be suppressed on a per-warning basis with special compiler variables. If you build in verbose mode, after each warning, an instruction is printed on how to disable it. In the install4j IDE, the description comes with a hyperlink to define the corresponding compiler variable.
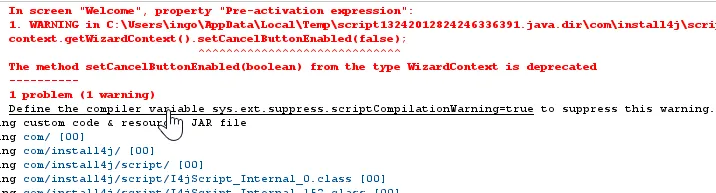
As you can see in the above screen shot, script compilation warnings are now printed during the build. This makes it easier to eliminate new deprecations and find possible bugs across the whole project.
A Maven plugin has been added. Previously, Maven integration was only available through a third party plugin. Now, the latest features will be available immediately when a new version of install4j is released.
To get started, see the pom.xml file in the "hello" sample project. In the configuration section of the plugin, you can add all options that can be passed to the command line compiler.
<plugin>
  <groupId>com.install4j</groupId>
  <artifactId>install4j-maven</artifactId>
  <version>9.0</version>
  <executions>
    <execution>
      <id>install4j</id>
      <phase>package</phase>
      <goals>
        <goal>compile</goal>
      </goals>
      <configuration>
        <installDir>/path/to/install4j</installDir>
        <projectFile>${'$'}{project.basedir}/hello.install4j</projectFile>
      </configuration>
    </execution>
  </executions>
</plugin>
In the above example, the install4j installation directory is specified. Alternatively, you can do that in the settings.xml file where you can also define the license key and keystore passwords.
<profiles>
  <profile>
    <id>development</id>
    <properties>
      <install4j.home>/path/to/install4j</install4j.home>
      <install4j.licenseKey>CHANGEME</install4j.licenseKey>
      <install4j.winKeystorePassword>SECRET</install4j.winKeystorePassword>
      <install4j.macKeystorePassword>SECRET</install4j.macKeystorePassword>
    </properties>
  </profile>
</profiles>
<activeProfiles>
  <activeProfile>development</activeProfile>
</activeProfiles>
In addition to compiling projects, you can also use the create-jre-bundle Mojo to pre-create JRE bundles. See the documentation for more details.
macOS single bundles archives now have a configurable setup application. The first time a new archive installation or update is run by the user, the configured installer application is launched. This means that you can use screens and actions to perform setup tasks that you would otherwise include in an installer.
To get the look & feel of the installer, you have to choose the "Launch in a new process" check box. If you launch the installer application in the same process, it will use the current look & feel. This is not recommended for JavaFX or SWT applications.
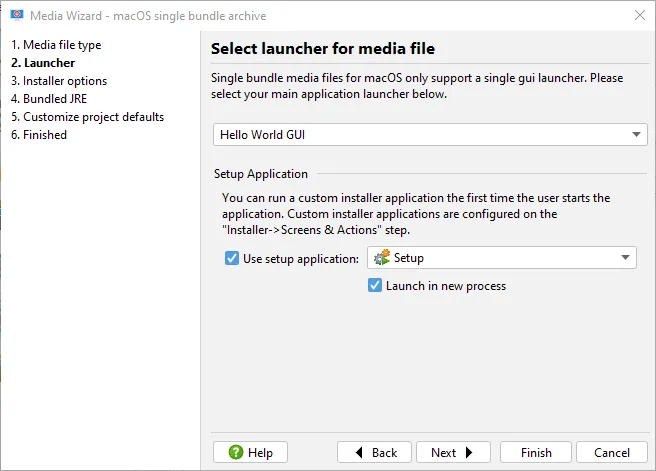
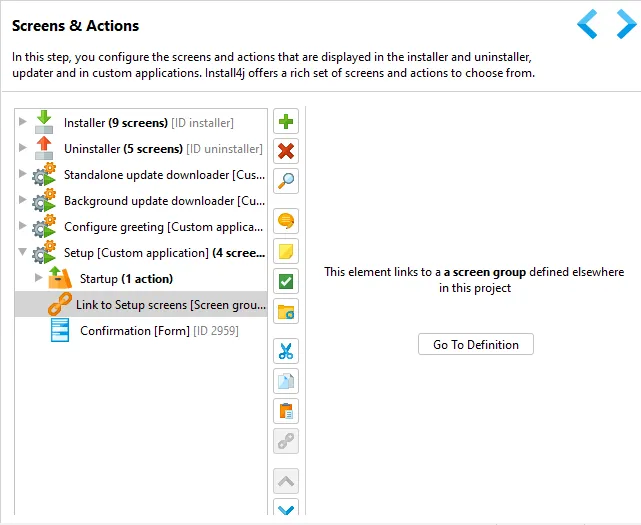
Installer applications are added on the "Installer → Screens & Actions" step and can contain links into other installer application such as the installer itself. In this way, you can reuse screens and actions in different contexts.
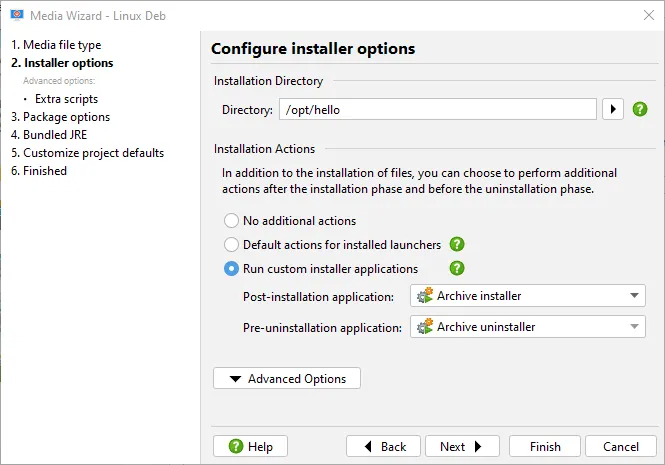
Linux RPM and DEB archives now have configurable post-installation and pre-uninstallation applications. On the "Installation options" step of the media wizard, additional installation actions are now configurable.
Previously, Linux archives always performed a set of default actions like adding symlinks and installing services. Additional steps could only be performed with shell scripts in the "Extra scripts" step for the various phases of the installation and uninstallation.
Since install4j 9, you can choose to either disable extra installation actions completely or to choose custom installer applications for the post-installation and pre-uninstallation phase.
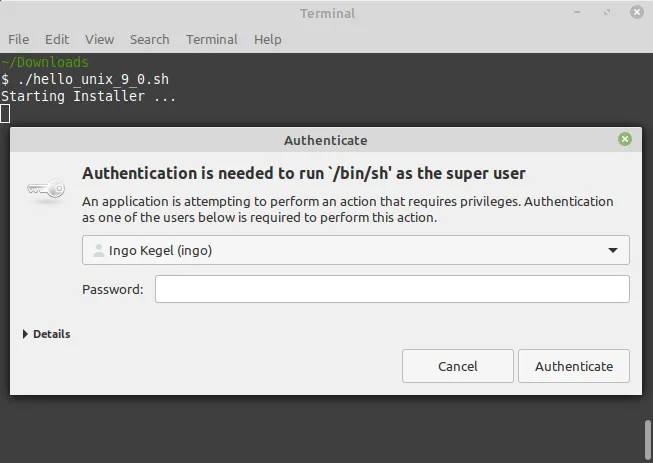
The "Request privileges" action can now elevate privileges on Linux. In previous versions, this was only implemented for Windows and macOS. The "Linux privilege requirement" property can take one of three values: "None" and "Require root" correspond to the "Show failure if current user is not root" property in previous versions of install4j. If the property is set to "Try to obtain privileges", the installer will start a helper process with pkexec in GUI mode and with sudo or su in console mode.
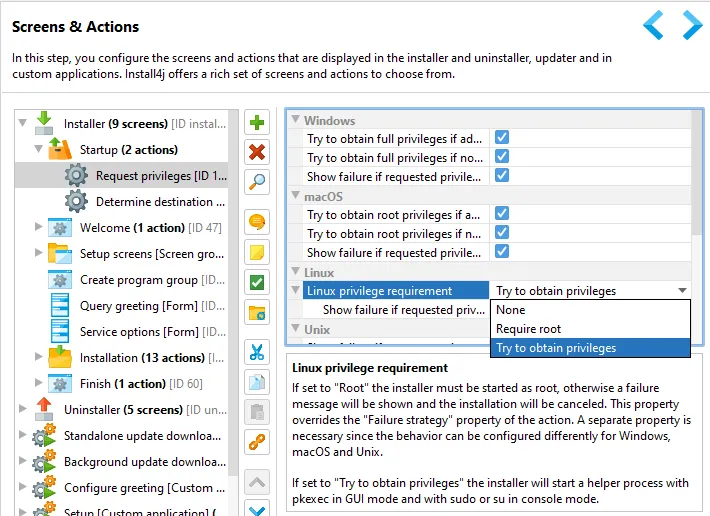
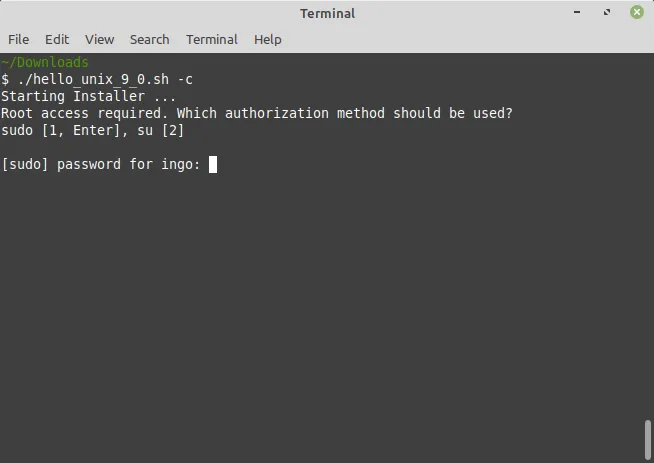
pkexec is a PolicyKit application that is available on most Linux distributions and uses the authentication dialog of the desktop environment to execute the elevated helper process with root privileges.
pkexec cannot be used in console mode, so install4j asks the user which command line authentication method (su or sudo) should be performed.
Search for IDs, names, property values and comments has been implemented in the "Screens & Actions" step, the "Styles" step, as well as form component dialogs.
There are two separate search actions, one for searching IDs, and one for searching various text values, both are accessible from the search button or through their keyboard shortcuts.
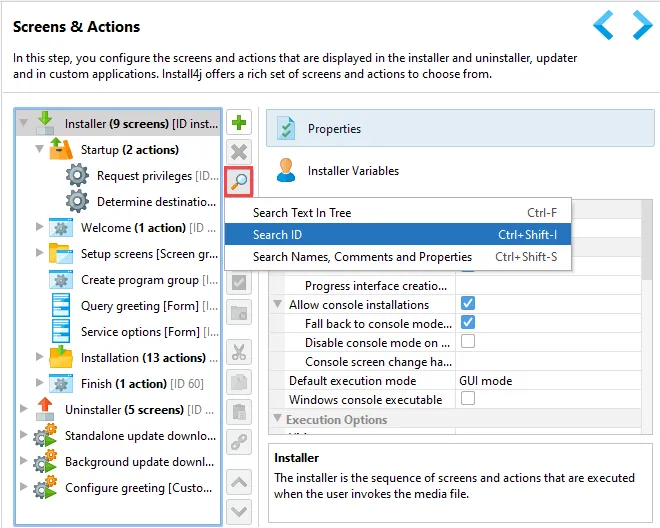
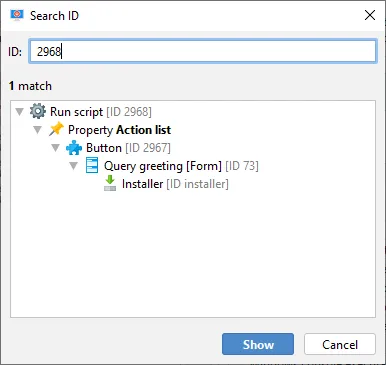
When searching for an ID, all screens, actions and form components that are reachable in some way from the current view are included.
The matching elements are shown at the top of the result tree together with the reverse path to the top-level element. When you confirm the search dialog, the match is shown in the install4j IDE.
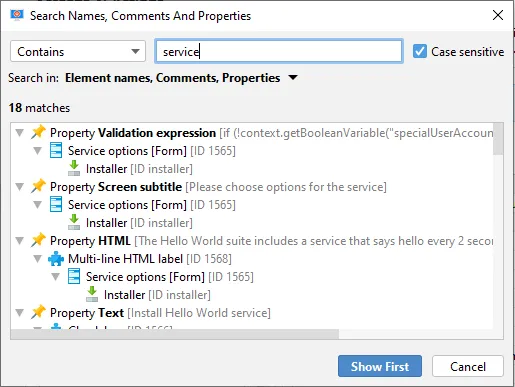
For text values a similar dialog is shown that provides optional text matching options like wildcards, regular expressions and case sensitivity. You can also choose whether to include element names, comments or property values.
By default, the first match is shown when confirming the dialog. You can show any other element in the result tree by selecting it beforehand.
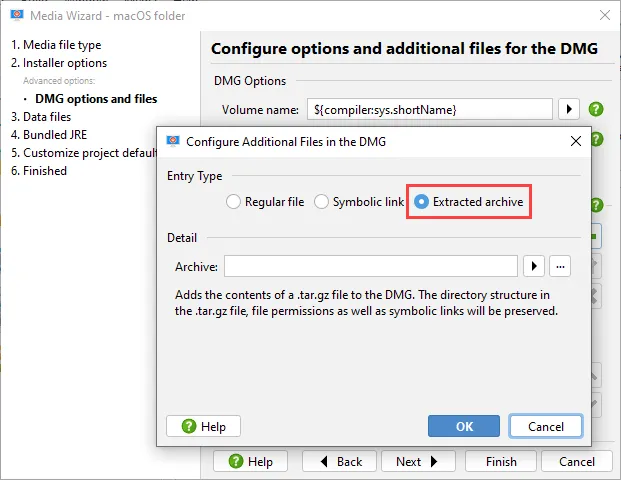
install4j 9 allows more flexible configuration of top-level files in DMGs. Top-level files appear in the Finder next to the launcher or the installer when you mount the DMG. You also need them to style DMGs.
In addition to single files and symbolic links, you can now add a .tar.gz file to include another application, an external installer or documentation to the DMG.
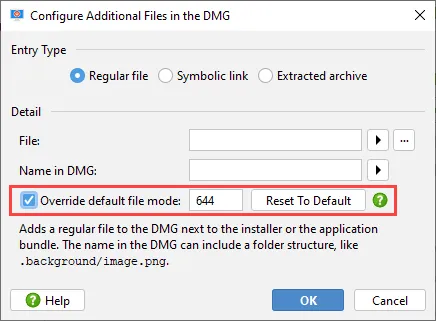
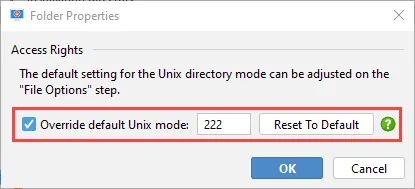
In addition, you can now specify the file mode for single files.
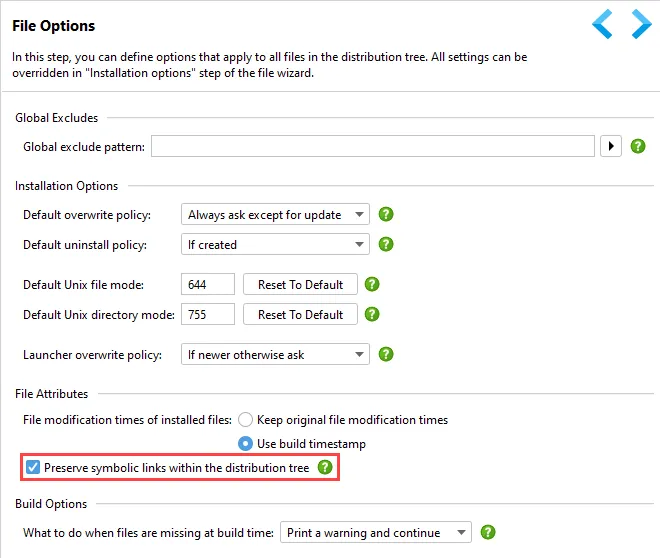
The install4j compiler can now preserve internal symbolic links in the distribution tree for non-Windows media files. On the "Files → File Options" step, the corresponding option can be deselected if this behavior is not desired.
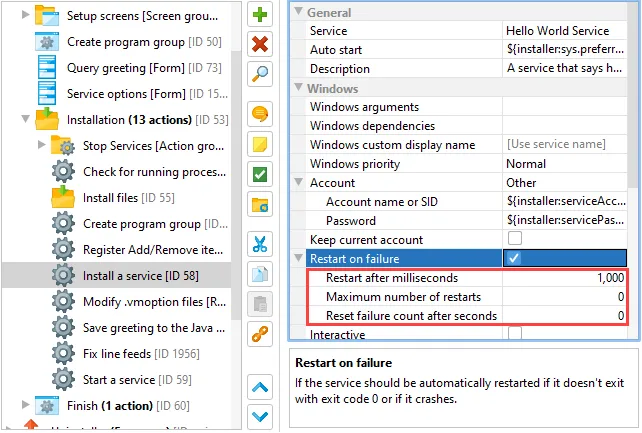
The restart behavior of the "Install a service" action can now be customized. The pause before restarting, the maximum number of restarts as well as the time threshold after which the failure count is reset are configurable as child properties of the "Restart on failure" property.
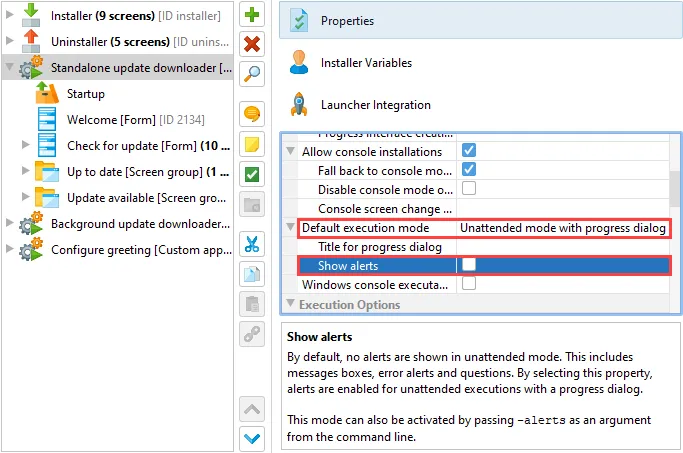
In unattended mode with progress dialog, alerts can optionally be displayed. This new mode can be activated with the "Show alerts" property for installer applications or the -alerts command line parameter.
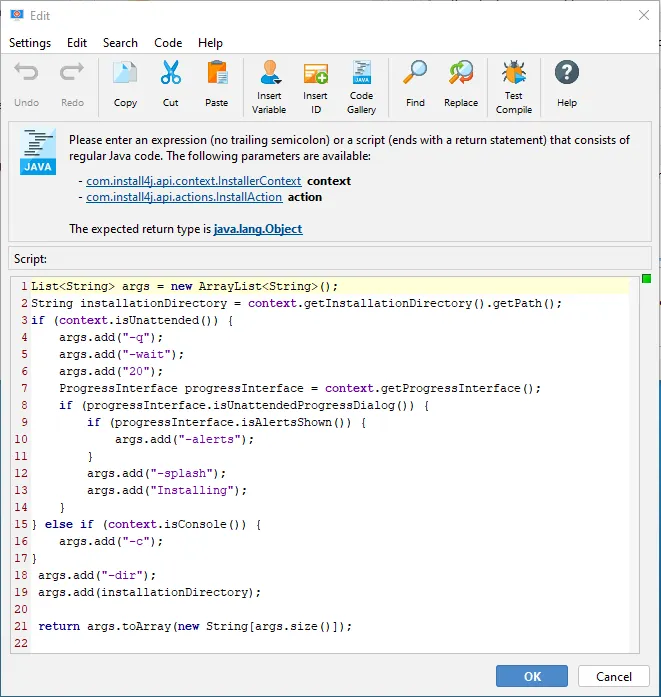
The update downloader template propagates the execution mode to the downloaded installers. Since install4j 9, it also propagates this alert setting. Because the update downloader is a template, this is not automatically updated for your existing projects. You would have to locate the action named "Set installer arguments" in the update downloader and replace the script with that from a new updater application.
The Unix default directory mode is now used for manual directory entries in the distribution tree and can be overridden when editing a manual directory entry. The default mode is configured on the "Files → File Options" step.
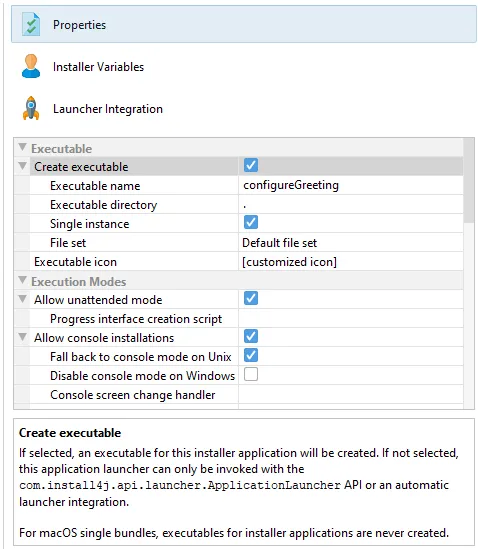
Custom installer applications now have a "Create executable" property to prevent the creation of
executables. In this case, the custom installer application can only be launched through the
ApplicationLauncher API and through launcher integrations.
Progress information can be obtained when using the ApplicationLauncher API.
Update downloaders and other installer applications are often launched with via
ApplicationLauncher.launchApplication or ApplicationLauncher.launchApplicationInProcess
in unattended mode.
Previously, there was no way to get progress information from the launched application, you could only wait
until it was finished. Since install4j 9, the callback that is passed to the ApplicationLauncher API has a method
createProgressListener that can be overridden to return your own implementation.
That progress listener then receives all progress information including status messages, screen and action IDs
as well as progress percentages.
The "HelloGui" class in the "hello" sample project shows you how to do that.
ApplicationLauncher.launchApplication("<ID>", null, true,
    new ApplicationLauncher.Callback() {
        @Override
        public void exited(int exitValue) {
        }

        @Override
        public void prepareShutdown() {
        }

        @Override
        public ApplicationLauncher.ProgressListener createProgressListener() {
            return new ApplicationLauncher.ProgressListenerAdapter() {
                @Override
                public void percentCompleted(int value) {
                    // TODO use
                }

                @Override
                public void indeterminateProgress(boolean indeterminateProgress) {
                    // TODO use
                }

                //TODO override other methods as required
            };
        }
    }
);