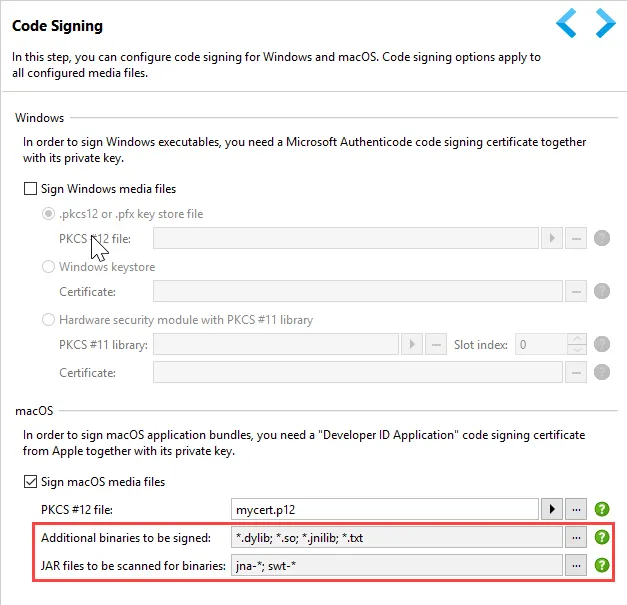
Notarization on macOS is now supported. This support consists of several parts: First, the created application bundles have the appropriate entitlements and declare the hardened runtime features required for notarization. Second, all contained binaries are now signed, even those contained in JAR files, for example for JNA or SWT. The scope of these signing operations is configurable in the "General Settings → Code Signing" step.
What's new in install4j 8.0
Change release:
Please see the change log for a detailed list of changes.
For a discussion of breaking changes when migrating from install4j 7, please see this blog post.
install4j 8.0 introduces the following notable new features:
Finally, if you build on macOS, the upload to the Apple notarization service via the Xcode tools and the stapling of the notarization info to the created media file after a successful notarization are performed by install4j if you select the "Notarize macOS media files" check box on the "Build" step or specify the --apple-id and --apple-id-password command line parameters.
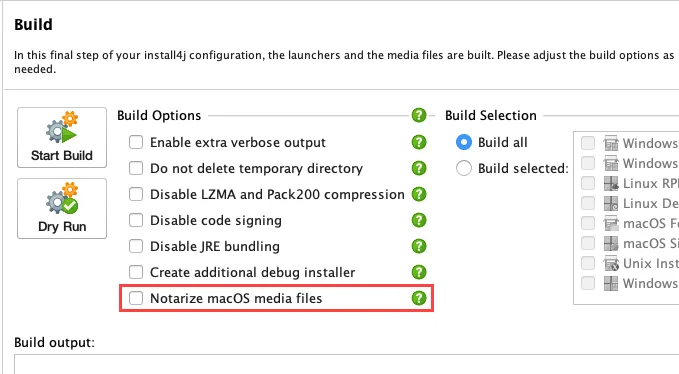
Notarization is mandatory for passing Gatekeeper starting with macOS 10.15.
Code signing for Windows now supports PKCS#11 hardware security modules (HSMs). Such modules are required for EV certificates.
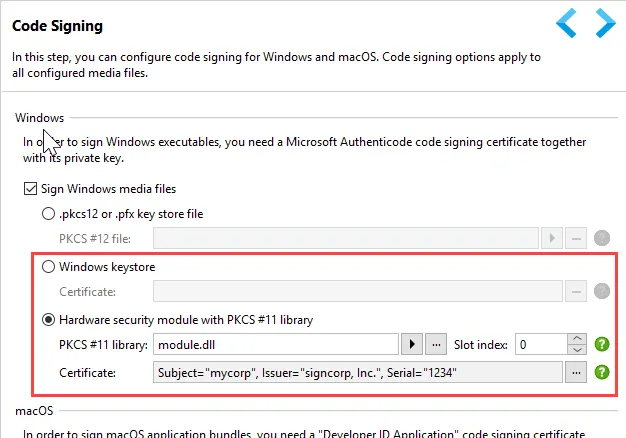
With a PKCS#11 HSM, you select the native library that was provided to you by the HSM vendor. For some HSMs, libraries exist for Linux and macOS, so you can set up cross-platform signing with EV certificates. Note that ej-technologies cannot provide any PKCS#11 libraries or solve problems when such libraries do not work as expected.
If you build on Windows, the Windows keystore is now also supported. This is the easiest way to sign with an EV certificate.
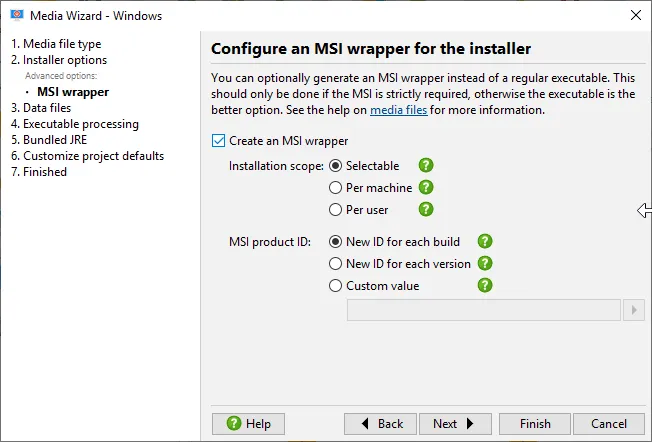
For Windows installers, you can now optionally generate an MSI wrapper instead of a regular executable. In some situations, the MSI format is required for company-wide deployments with special tools. In all other cases, the regular executable is preferable and offers better performance and lower overhead.
In the media wizard, MSI generation can be enabled and some options can be configured for bridging mismatches between concepts in install4j and MSI.
Automatic JRE bundle creation. Previously, ej-technologies provided JRE bundles that could be downloaded in the IDE. Since the advent of the modular JDK and diversified OpenJDK distributions, this is no longer sufficiently flexible. Starting with this release, install4j will download JDK bundles from selected OpenJDK distributions on demand and link JRE bundles according to the requirements of your project.
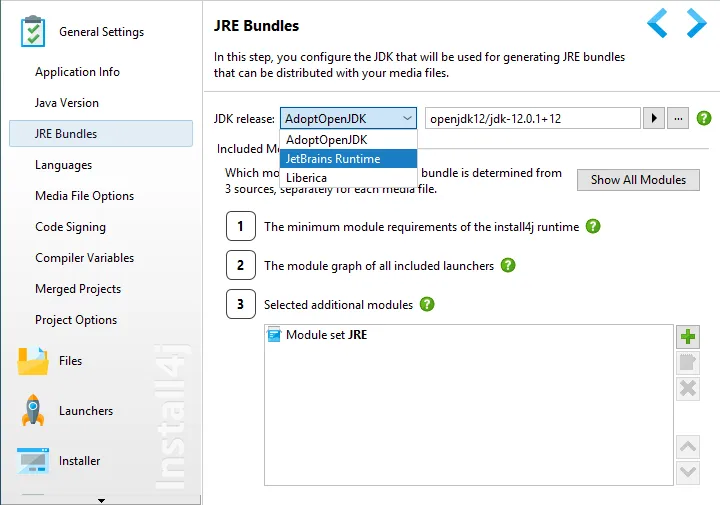
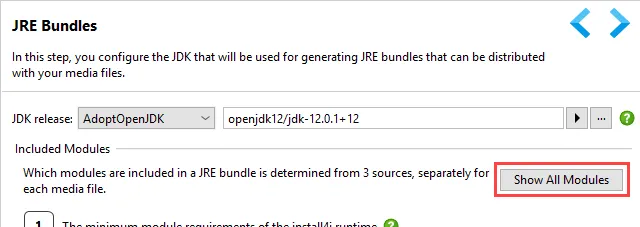
On the new "General Settings → JRE Bundles" step of the install4j IDE you first configure the JDK provider. In this release, AdoptOpenJDK, the JetBrains Runtime and Liberica are supported.
In the resources directory of your install4j installation the JAR file jdk-provider.jar with its adjacent source and javadoc JAR files contains the SPI for JDK providers, so you can write a new JDK provider yourself.
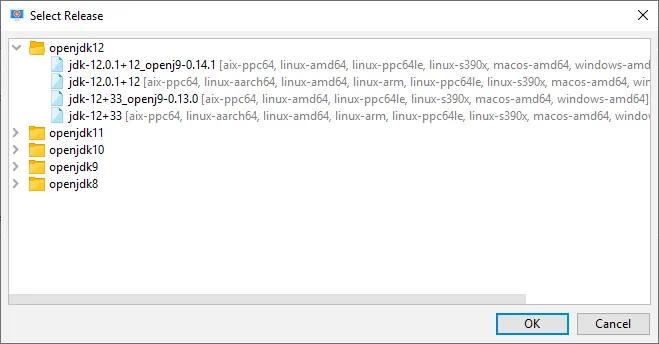
Once the JDK provider is configured, you can select a release. The release string usually contains the version, but may include other information as well.
In the release selection dialog, you can also see all the available platforms. The platforms windows-amd64, windows-x86 and macos-amd64 are automatically matched to the Windows and macOS media files, for Linux/Unix media files you specify a platform on the "Bundled JRE" step of the media wizard.
For Java 8 and Java 7, the JRE is monolithic and is included in the JRE bundle in its entirety. For Java 9 and higher, the new modularity of the JDK allows a selection of modules that are included in the generated JRE bundle. install4j will always include modules that are required by the install4j runtime as well as modules that are defined on the module paths of the generated launchers together with all their transitive dependencies.
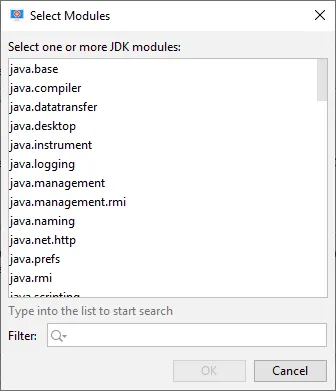
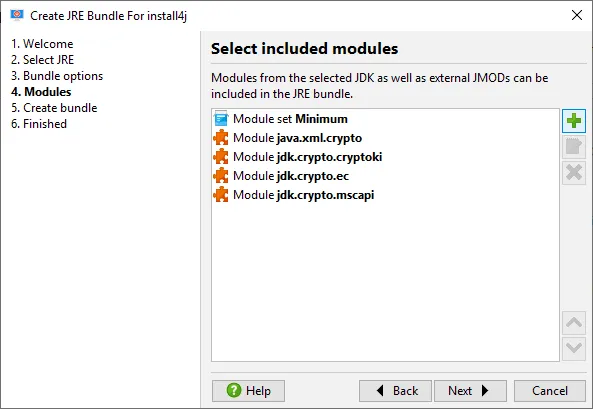
Often it is necessary to include modules on which there is no direct dependency, usually because they implement an SPI. In the module selector you can select the names of the modules that should be included from a list of all modules in the selected JDK.
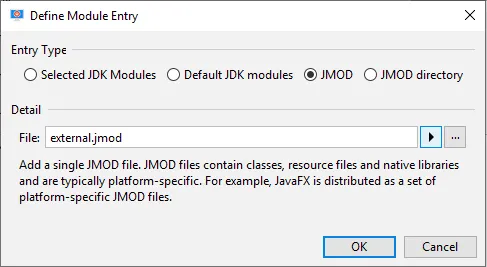
In addition, you can add JMOD files from external sources. For example, JavaFX comes as a set of JMOD files.
At any point during your configuration, the "Show All Modules" button will tell you which modules will actually be included in the generated JRE bundle. Transitive dependencies of your configuration are included automatically and are listed as well.
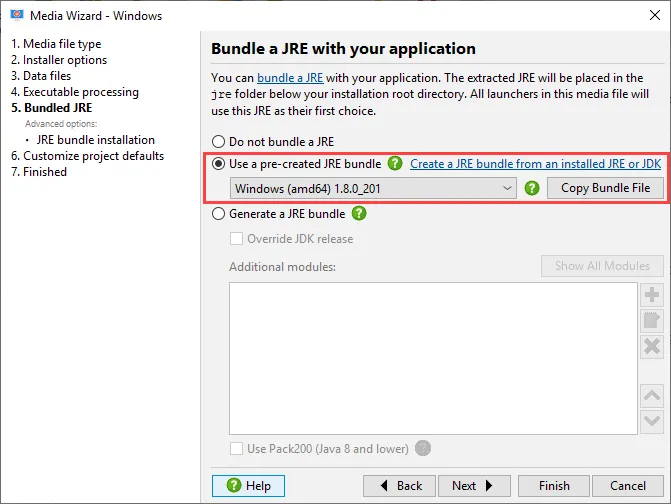
In addition to setting up the common configuration on the "General Settings → JRE bundles" step, you have to enable JRE bundle generation on the "Bundled JRE" step of the media file wizard for each media file.
Here you can override the JDK provider, the JDK release and add additional modules for the JRE bundle generation.
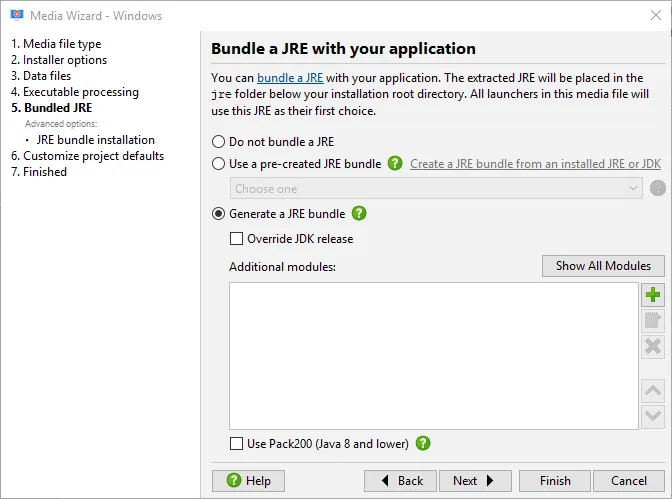
For Java 8 and lower, Pack200 is used to compress JAR files in the JRE if the "Use Pack200" option is enabled. For archives this is not necessarily desirable because of the first-time unpacking overhead when starting a generated launcher, so this option is off by default for archive media files.
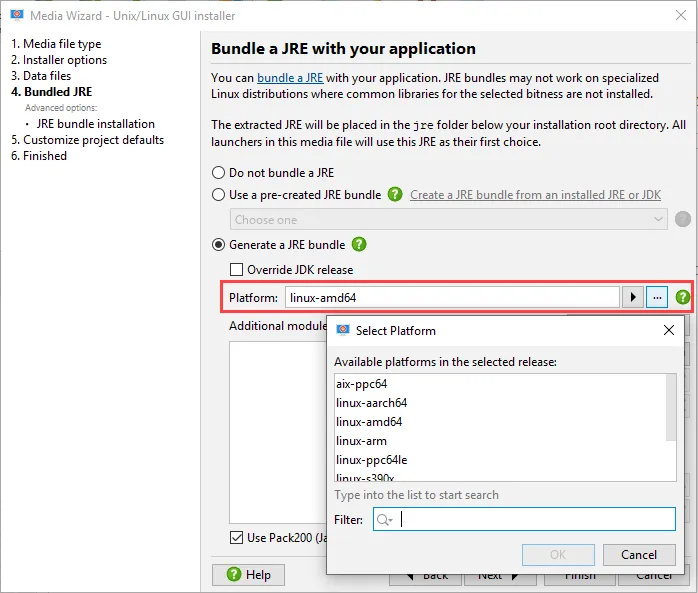
For Linux/Unix media files, the default platform is linux-amd64 which stands for 64-bit Linux. The selector button next to the platform test field shows you all platforms that are available for the selected JDK release.
Apart from JRE bundles that are generated from the JDK providers, you can also pre-create JRE bundles from arbitrary JDK or JRE installations by invoking "Project → Create a JRE Bundle" or using the bin/createbundle command line tool. This is like in earlier versions of install4j except that the JRE bundle creation wizard is now able to link modular JRE bundles according to your module requirements, including the ability to add external JMOD files.
Bundles that are created in this way as well as bundle from previous versions of install4j can be configured as pre-defined bundles on the "Bundled JRE" step of the media wizard.
Downloaded JDK archives and generated JRE bundles are cached in $HOME/.install4j8/jres. You can move the contents of that directory to another machine to avoid downloads and speed up builds.
Cross-platform support for URL handlers has been added. The "Register a URL handler" action works on Windows, macOS and Linux and can associate custom URL schemes with a launcher.
For example, a custom scheme hello will match URLs like hello://world. The entire URL will be passed to the main method or can be obtained via the StartupNotification API in the launcher on macOS or if the launcher is in single instance mode.
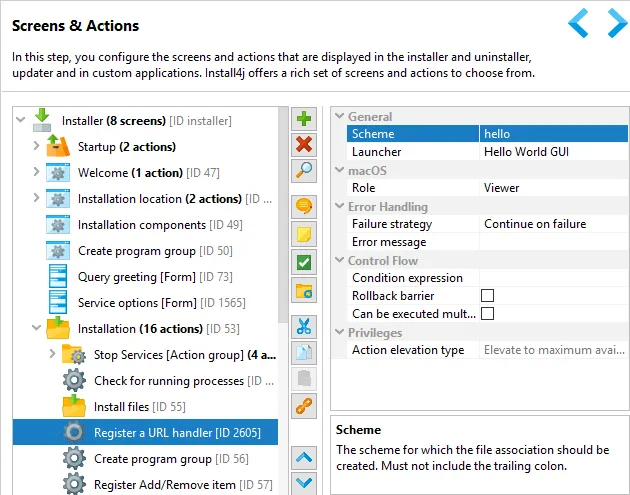
In this way you can support migrations from Java Web Start to an installer generated by install4j while retaining the ability to start the application from the browser.
File associations now work for more media file types:
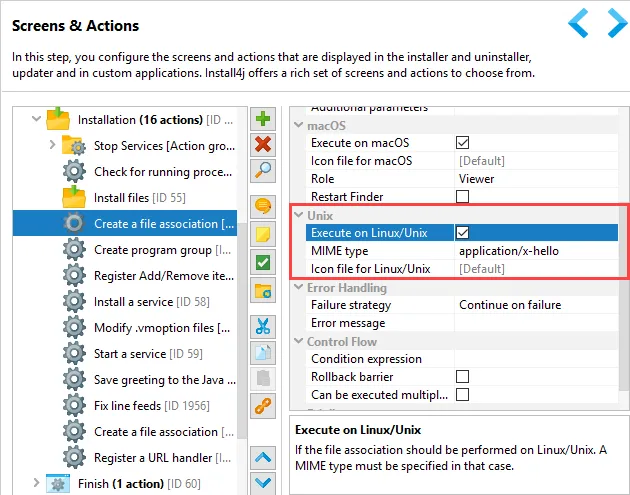
File associations on Linux have been implemented. The existing "Create a file association" action now has a "Unix" property category where you can define a mime type and a document icon.
File associations in macos archive media files have been implemented. On macOS, a file association is defined through special entries in the Info.plist file. Previously, you had to insert a custom fragment into the Info.plist file yourself, now file associations as well as the new URL handlers that are defined with actions in the installer are added automatically.
On the "Executable info → macOS options" step of the launcher wizard, you can select which file associations and URL handlers should be included.

Improved support for Linux .desktop files. One of the main problems with GUI applications on Linux was that it was not possible to associate task bar icons. Now, install4j creates unique wrapper main classes for launchers and associates the proper launcher icons in the generated .desktop files.
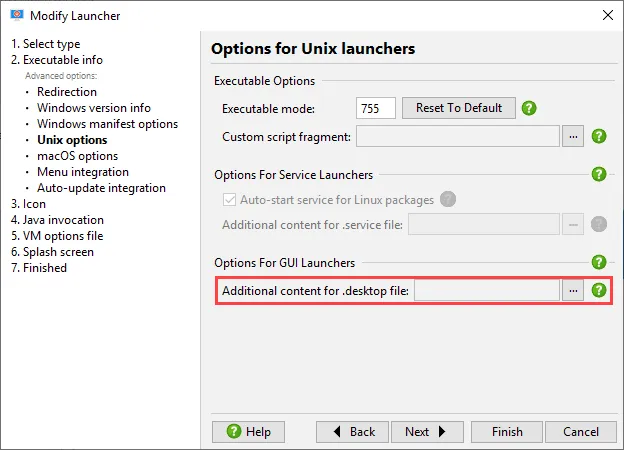
Additional entries for .desktop files can now be specified in the "Create start menu entry" and the "Add a desktop link" actions.
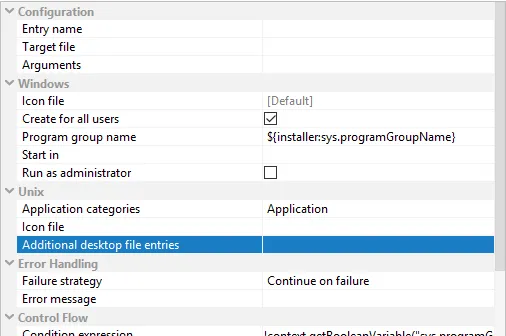
For the "Create program group" action and for the top-level desktop files that are generated for Linux/Unix archives, the "Executable info → Unix options" step of the launcher wizard offers a way to specify additional entries:
Explicit systemd support. In previous versions of install4j, systemd was supported through the SysV compatibility layer of systemd. This prevented further customization of systemd-related behavior. Starting with install4j 8.0, the "Install a service" action detects if systemd is used on a Linux/Unix installation and generates a .service file.
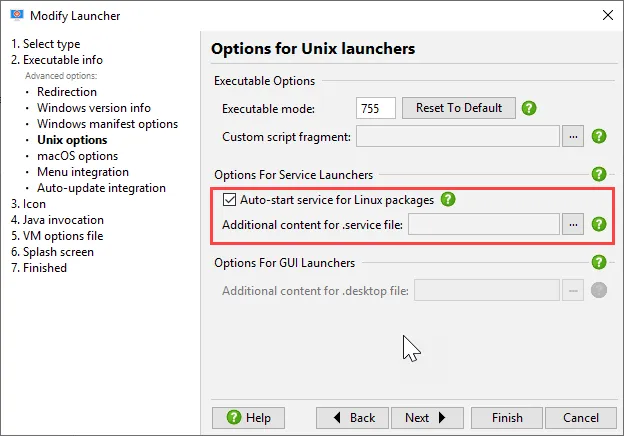
Additional entries for .service files can be configured on the "Install a service" action.
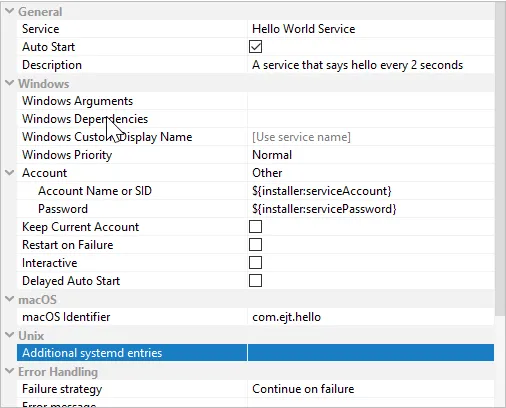
For RPM and .deb archives, no such action is executed and the additional .service file entries can be entered on the "Executable info → Unix options" step of the launcher wizard instead.
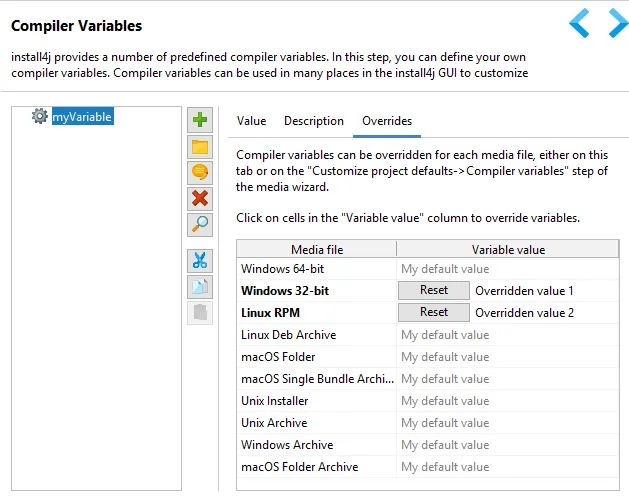
install4j 8 brings many enhancements for compiler variables.
On the new "Overrides" tab of the "General Settings → Compiler Variables" step, you can manage the overrides of a compiler variable for all media files in one place. The previous way of editing all overrides for a media file in the "Customize project defaults → Compiler variables" step of the media wizard still exists.
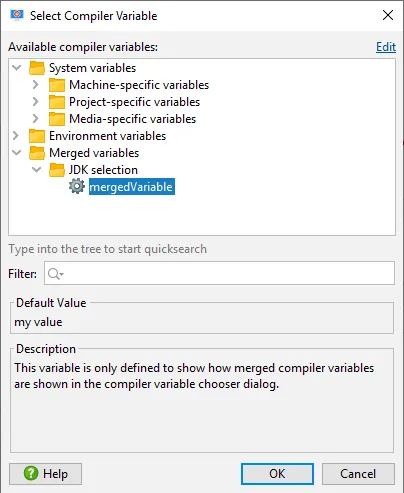
In the compiler variable chooser dialog, variables are now grouped into categories, and compiler variables from merged projects are now shown.
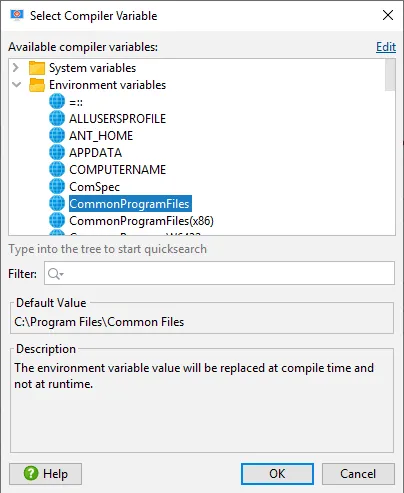
Also, environment variables can now be inserted via the compiler variable chooser dialog. They are resolved at build time.
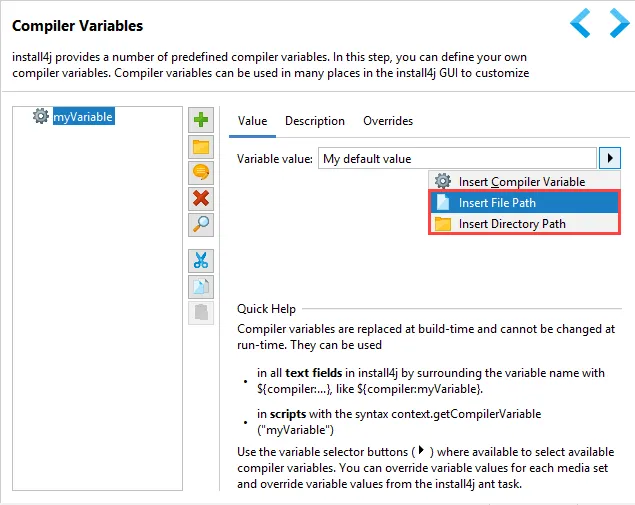
The values of compiler variables are often set to file or directory paths. To assist with this selection, the variable chooser button for the compiler variable value now contains actions to insert file or directory paths. The file chooser has an option to convert the selected path to a relative path.
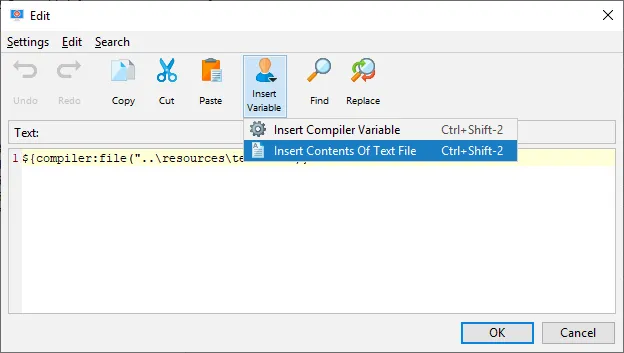
To add multi-line compiler variables to a text editor, the new syntax
${'$'}{compiler:file("path/to/file")}
has been added where relative files are resolved relative to the project file. In text editors, an action to insert the contents of a text file has been added.
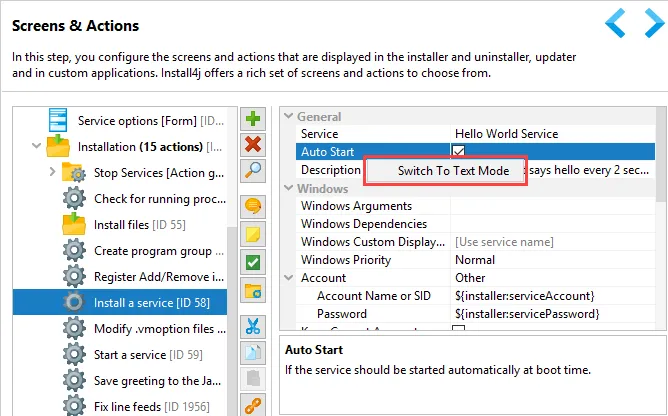
A text mode for non-string installer variables has been added in the install4j IDE. This solves the long-standing problem that all properties that do not have a text field editor cannot benefit from the replacement syntax of installer variables. For example, in the "Install a service" action, you may want to dynamically set the "Auto start" property with a boolean installer variable, but there is no place where to write the installer variable expression.
Starting with install4j 8.x, the context menu of such properties contains an action to switch to text mode.
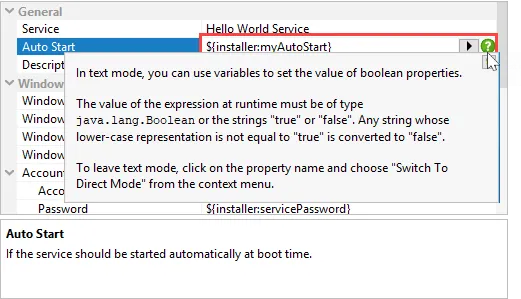
If a property is in text mode, you can insert an installer variable that contains a value of the type that is indicated in the help tool tip to the right of the text field. Because compiler variables can only contain string values, there is an automatic conversion of string values to the target type. For boolean properties, "true" or "false" are acceptable, numeric values are parsed from strings and enum values can also be specified with their ordinal values, which is the same as the index of the desired option in the popup menu. Finally, colors can be written as RGB hex values (ffffff for white).
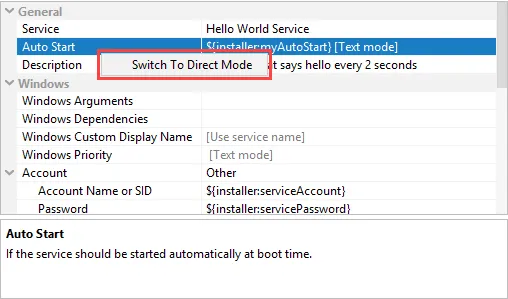
Properties that are in text mode are specially marked and can be switched back to direct mode with an action in the context menu.
If you want to use this mechanism for your own custom beans, you have to opt in for each property by calling setAllowTextOverride(true) on the Install4JPropertyDescriptor in your BeanInfo class. At runtime, you have to return replaceWithTextOverride("propertyName", defaultValue) from the property getter. See the ManyFeaturesAction in the "customCode" sample project for an example.
A default value syntax for variable expressions in text fields has been added. Up to now, if you inserted a variable expression like
${'$'}{installer:myVariable}
then the installer myVariable had to be defined, or an exception was thrown. Default values had to be configured on the "Installer variables" tab of the installer configuration. With the new syntax that uses an "Elvis" operator like in Kotlin or Groovy, the expression
${'$'}{installer:myVariable?:defaultValue}
inserts "defaultValue" if the installer "myVariable" is not defined. This syntax can be chained, so you can check other installer or compiler variables as well, for example
${'$'}{compiler:myVariable?:${'$'}{compiler:myOtherVariable?:defaultValue}}
Live binding of installer variables now works on all form components that show text in some way. When you use an installer variable expression like
${'$'}{installer:myVariable}
in a property that defines the displayed text and the contents of the installer variable changes, the displayed text changes automatically.
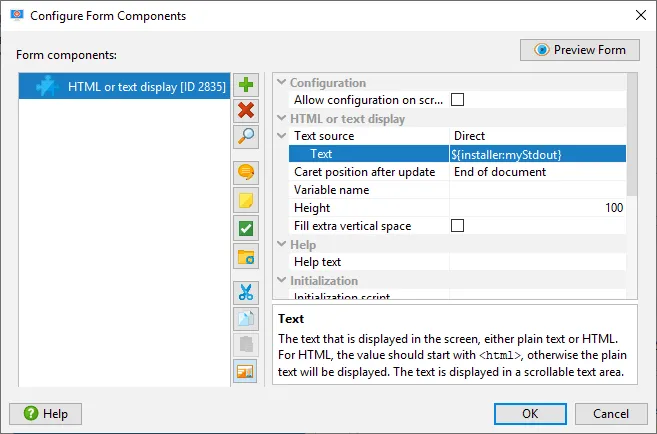
A use case that is now possible is to show the stdout output of a "Run executable or batch file" action in a "Html or text display" form component. To do that, the "Redirect stdout" property property of the "Run executable or batch file" has to be set to "To installer variable" and the "Update variable after each line" child property has to be selected.
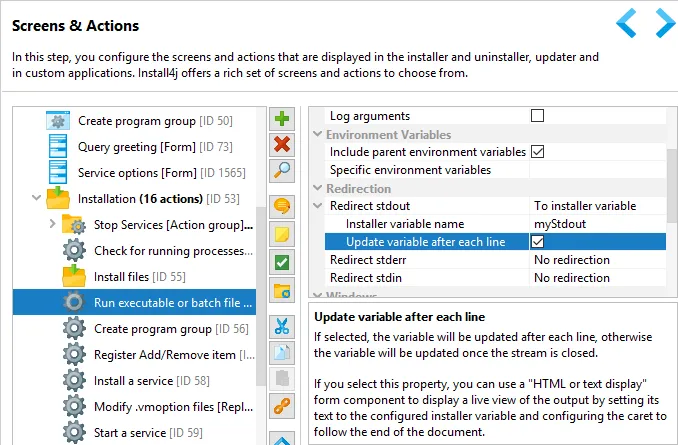
If the "Html or text display" form component displays the same installer variable and its "Caret position after update" property is set to "End of document", the stdout output will scroll by as it is produced the executable.
install4j 8.0 includes two new form components for working with text files:
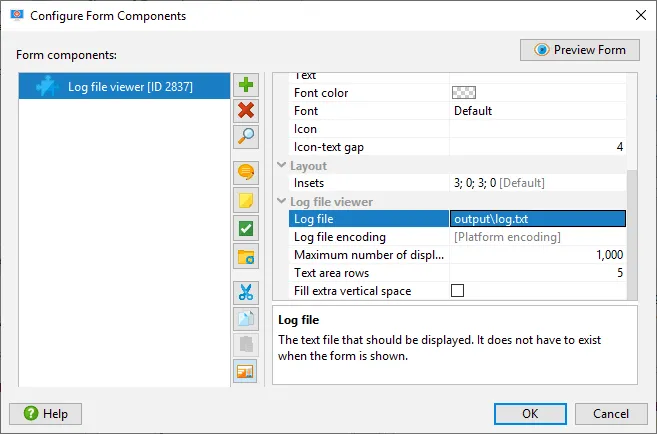
A "Log file viewer" form component has been added. Similar to the coupling of the "Run executable" action and the "Html or text display" form component above, it can display the output of an external executable, except it displays the contents of a text file and not a process output stream. Also, the displayed text is capped with a configurable maximum line count, so continuous output to the log file does not produce any memory overhead.
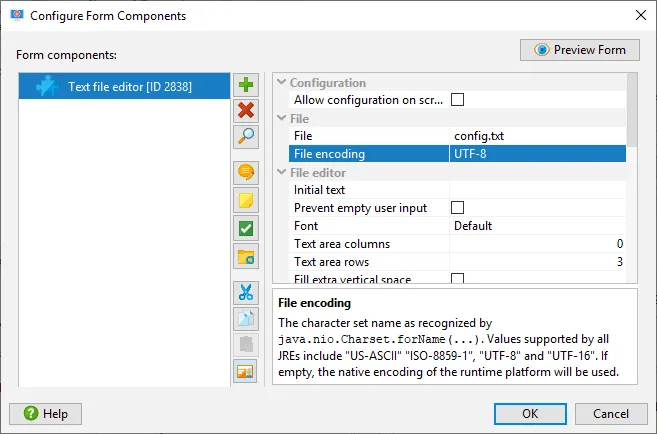
With the new "Text file editor" form component you can let the user edit a text file. This is often useful for config files with many options that would be difficult to translate to UI elements.
Better mechanism for changing the log file location have been implemented. The new command line parameter
-Dinstall4j.log=<path>
writes the log file to an absolute or relative path and prevents it from being deleted or moved to the installation directory. Also, you can use installer variables in the specified path, so adding something like
-Dinstall4j.log=${'$'}{installer:sys.appdataDir}\log_${'$'}{installer:sys.timestamp}.txt
to the "VM parameters" property of the installer could help you to save unique log files to an external directory.
You can now also change the log file location with the API by calling Util.moveLogFile(...).
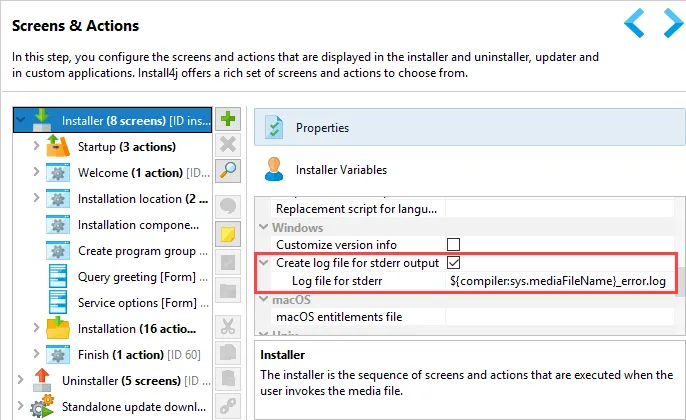
On a related note, the stderr log file for Windows installers is now configurable and is set to a name that includes the media file name by default.
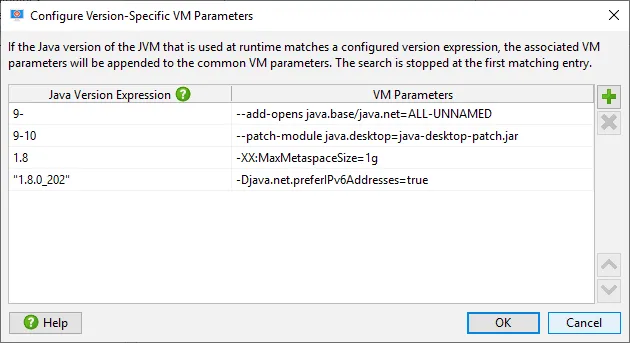
Version-specific VM options for launchers now support ranges for major version numbers. Previously, only a string-based "starts-with" comparison for the entire version string was available. With the new fast-moving JDK releases this has become impractical, and you can now specify major version ranges like 9-11 or half-open version ranges like -10 and 11-. In addition, you can match specific versions by surrounding them with quotes, like "1.8.0_202" and inside the quotes you can use the wildcards * and ?.
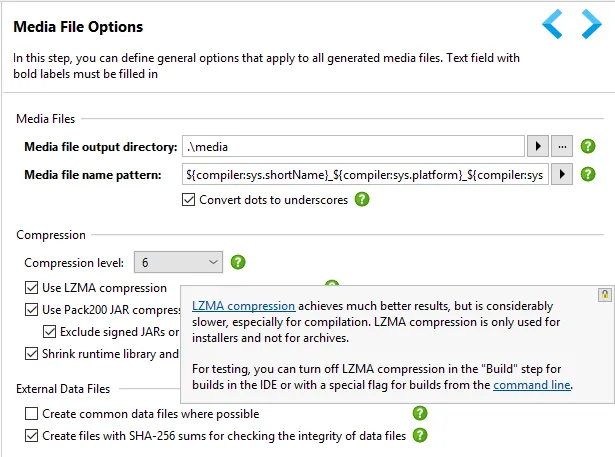
install4j now uses SHA-256 instead of MD5 checksums. As part of the compilation, the file sha256sums is created in addition to the file md5sums.
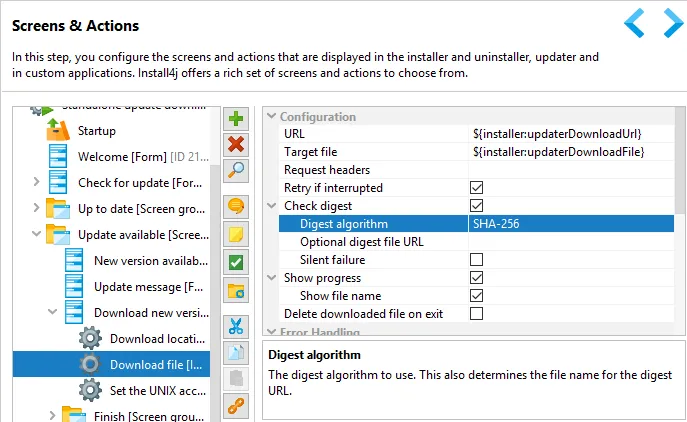
If the "Check digest" property of the "Download file" action is selected, you can now change the digest algorithm from its new default SHA-256 to MD5 or activate a mode where MD5 is used as a fallback if the download of the sha256sums file fails.
The project file format has been improved. It is now a lot less verbose than before, and only non-default values are written to the file. Also, bean serialization is more compact and more readable. The size reduction for typical project files is more than 50%.
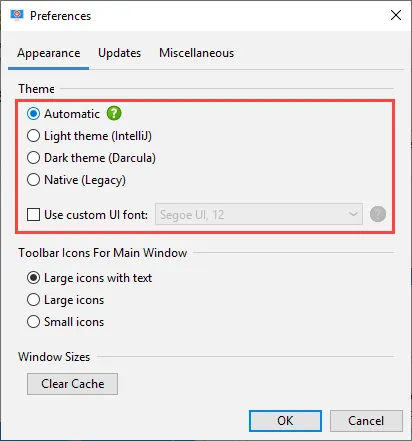
install4j has new light and dark look and feels. The look and feels are based on the IntelliJ IDEA Darcula look and feel and its light derivative. These look and feels support HiDPI on Windows, Linux and macOS. On Windows and macOS, install4j is bundled with the JetBrains Runtime that has better HiDPI support than the default JDK.
The default setting for the look and feel is now "Automatic", which chooses the dark theme if the OS is in dark mode and the light theme otherwise. This detection is currently implemented on macOS 10.14+ and Windows 10 build 1809+.
Also, it is now possible to choose a custom font for the UI.
The documentation has been rewritten from the ground up. Instead of the old reference-style documentation that focused on explaining all the UI elements, the new documentation is in the form of a book that can be read sequentially. Plenty of screen shots illustrate the context of each chapter.
In addition to the HTML and PDF formats that are included in the install4j distribution, the documentation is now also available as an eBook in epub and Kindle formats. The eBook files can be downloaded from the website.
With the F1 key, you can show the most relevant chapters of the book directly from the UI. Many UI elements now have adjacent help icons that show tool tips with detailed explanations.