install4j 4.2 introduces the following notable new features:
Includes in .vmoptions files. A .vmoptions file is the file next to a launcher that allows you
to specify additional VM parameters. In this release, a new special option
-include-options [path to other .vmoptions file]
was added. The path to the other .vmoptions file can be
One include per .vmoptions file is supported Linux/Unix, on Windows, multiple includes are supported.
Recursive includes are supported on Windows and Linux/Unix. On Mac OS X, .vmoptions files are not
supported.
Improved persistence of installer variables. Previously, accessing installer and compiler variables in
your own applications was not directly supported. With the new
com.install4j.api.launcher.Variables
class, you can access installer variables that were saved in the automatically created response file, as well
as all compiler variables that were defined in the install4j IDE.
Object myVariableValue = Variables.getInstallerVariable("myVariable");
All form components register their variables as response file variables automatically, so user input
from forms is automatically available in your applications without the need for any further configuration.
Compiler variables are retrieved with
String version = Variables.getCompilerVariable("sys.version");
In addition to response files, installer variables can now be
persisted to the Java preference store
with the new "Save installer variables to the Java preference store" action. Those variables could
be read by another installer with a different application id by using the
"Load installer variables from the Java preference store" action. Also, you can load them in your application by calling
Map variables = Variables.loadFromPreferenceStore(true);
(the boolean flag indicates that the user-specific registry is to be used).
In that way, you can modify the variables and save them back with
Variables.saveToPreferenceStore(variables, true);
to maintain a single configuration store used by installers and your application.
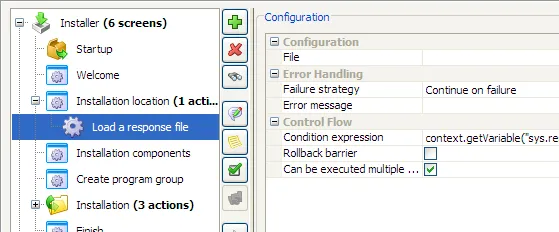
Support for loading response files in the installer. Until now, a response file could
only be specified on the command line with the -varfile option and was mainly useful for unattended
installations. In this release, a "Load response file" action has been added that can load user input
from a previous installation.
In the default installer template, a "Load response file" action has been added to the "Installation location"
screen. Once the user chooses the installation directory, the action tries to load user input from a previous installation
to the same directory.
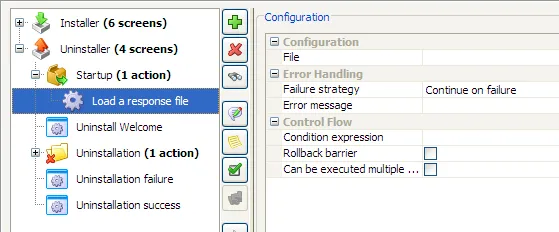
In the default uninstaller template, a "Load response file" action has been added to the startup sequence so that
you have access to all response file variables from the installer.
Note that these changes only apply to the default template for new projects. For existing projects, you have to add the
"Load response file" actions yourself.
Improved proxy handling and server side authentication. Both installers with downloadable installation components
and updaters need to download files from the internet which often behind a proxy server. Previously, install4j
queried the user when it could not create a direct connection to the internet. Now, the proxy settings of the default browser
are used automatically on Windows and the proxy configuration dialog is use as a fallback if these settings fail.
A possible proxy authentication still has to be provided if necessary.
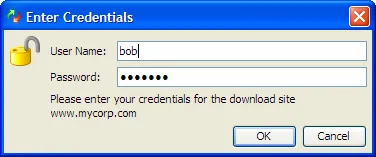
In addition to proxy authentication, install4j now also supports server side authentication.
If the downloaded file is in a password-protected directory, the installer will ask the user
for credentials.
Console access for Windows GUI launchers. GUI launchers on Windows do not have access to the console
from which they were launched. All output to stderr and stdout is lost unless it is redirected internally.
This release adds an optional -console parameter to all generated launchers that will try to find the
invoking console and attach stderr, stdout and stdin to it. This is useful for debugging purposes or for simulating a
console mode with a GUI executable.
In order to activate the -console command line parameter, you first have to enable it in the launcher wizard:
Visual progress for unattended execution. If you call an installer, an uninstaller or a custom installer
application programmatically, you will often want to call it in unattended mode, for example for custom patch
installers or for automatic updaters. Unattended installations do not display a GUI but perform their
work without displaying a GUI. Now it is possible to show a progress window with a custom title that
shows all status and progress information that is provided by the executed actions. To enable this progress
window (and unattended mode), specify
-q -splash [window title]
as arguments to the installer application.
In addition, when calling unattended installers from your application you have to shut down your own application
otherwise the unattended installer will fail. You can now tell the installer to wait for all
launchers to exit by specifying
-wait [timeout in seconds]
If the timeout is reached and your application is still running, the unattended installer will exit with an error message.